Discussions
Use the Discussions tool in your course to encourage users to share thoughts on course material with their peers. You can set up forums and topics where users can post questions, discuss course content and assignments, and work together in assigned groups and sections.
Visual tour of the Discussions tool
There are five key points of navigation in the Discussions tool to help you create and manage discussions in your course.

- Discussion Lists: Display an overview of forum topics. Click the topic link to view threads in that topic or click the drop-down button besides the topic for more options.
- Subscriptions: Set your default notification method for the discussion items you are subscribed to. You can also use the Change your notification settings link to update your contact methods, summary of activity, and what method is used to receive instant notifications for various tools and features.
- Group and Section Restrictions:Set restrictions for individual sections. You can also set restrictions for individual learners within a group or section.
- Statistics:An overview of the activity levels in your Discussions. This area is divided into two tabs: User and Forum and Topics. Org Unit Statistic are displayed on either tab.
- Settings: Configure your personal display options, org unit (course) settings, and the default settings for availability conditions.
Click on the topics below for detailed instructions on how to set up, edit, and grade Discussions.
Getting Started with Discussions
About
Your course can have multiple discussion forums and topics. Think of Forums as the category that you discussion topics will be categorized under. The topic is where students make posts. So you can set up multiple topics under each forum.
Note: There are several different ways in which you can create forums and topics in Brightspace. We have chosen to describe this method in detail as it's the least complicated. To view additional methods check out the Other ways to set up forums and topics accordion.
Creating a Discussion Forum
Use forums to organize your discussion topics into categories. Your course can have multiple forums and topics, but you must create a forum before you can create a topic since all topics belong to forums.
- On the Navigation Bar (navbar) of your course, click Assessments and select Discussions.
-
On the Discussions List page, from the New button drop-down menu, click New Forum.

- Enter a title for your new forum.
- To automatically create a topic with the same name, click the Create a new topic in this forum with the same titlecheckbox, located under the forum Title field. If you skip this step, you will be able to manually create a topic once you’ve completed the forum setup. Instructions on how to manually create a topic follow this section.
- Enter a description for your new forum, if desired.
-
In the Options section, select any of the following check boxes:
- Allow anonymous posts - To enable users to post anonymously.
- A moderator must approve individual posts before they display in the forum - To ensure that posts are approved by a moderator before they display in the forum.
- Users must start a thread before they can read and reply to other threads in each topic - To ensure user participation.
- Display forum descriptions in topics - To provide instructors the option to display a discussion forum description within a discussion topic description.
-
On the Restrictions tab, you have the options to set Start and End Dates to limit when students can access the Forum and customize the extent of their access outside of those times:
- Visible with access restricted before start / after end: Students can see that the Forum exists but cannot see any of the Topics in it. Only the Forum title, Start/End Dates, and restrictions will be visible to the students.
- Visible with submission restricted before start / after end: I.e., read only. Students can enter the Forum’s Topics to view the description and attached rubrics and to read threads and replies. But they cannot post new threads or replies in the Topics.
-
Hidden before start / after end: Students will not be able to see that the Forum (or any Topic in it) exists, and it will not appear in the Calendar.

Note: Forums are set to Visible with access restricted by default. You can change this default for your course by clicking on the Settings button at the top of the discussion page and adjusting the Availability condition Defaults.
- Click Save and Close or Save and Add Topic to automatically go into the Create a New Topic setup.

You have now created a Discussion forum and need to add at least one topic in order for students to be able to post.
Creating a Discussion Topic
Your course can have multiple forums and topics. Topics must be nested under a Forum. The following instructions are assuming that you have already set up at least one forum.
-
From the Discussions List page, click the New button, then click New Topic.

-
On the new topic page, enter a topic Title, then do any of the following:
-
Click Change Forum to either:
- Create a new forum to nest your topic, or
- Connect your topic to an existing forum.
- Add your topic to your grade book, enter a value in the Grade out of field.
- Enter a Description for your topic using Brightspace Editor.

-
Click Change Forum to either:
-
In the Availability Dates & Conditions menu, enter the following:
- Enter a Start Date and End Date.
-
Adjust the Before end and After end restrictions based on your preferences by selecting from the following options:
- Visible with access restricted – Students can see the topic and description but cannot access or read posts.
- Visible with submission restricted – Students can access the topic and read posts but cannot submit.
- Hidden – Students cannot see topic.
- Click Add Release Condition to create a new release condition or add an existing one.
- Under Group and Section Restrictions, you can set different restrictions if you have Groups or Sections set up in your course.

-
In the Post & Completion menu, select the checkboxes for any of the following options to apply them your discussion topic:
- Default participation
- Allow learners to hide their name from other learners
- Learners must start a thread before they can view or reply to other threads
- Posts must be approved before they display in the topic

-
In the Evaluation & Feedback menu, do the following:
- Click Add Rubric to attach a rubric to your discussion topic.
- Select the Allow evaluation of individual posts checkbox if you want to assign scores to posts. Then, select your Calculation Method. You can also choose to Include unevaluated posts in the topic score calculation as zero.
- Select Allow learners to rate posts if you want your learners to score others’ posts. Then, select a rating type.

- Toggle the Visibility ON or OFF.
- Click Save and Close
How to Edit the Settings of a Forum or Topic
- On the navbar, click Assessments, then select Discussions.
- On the Discussions List page, click the context menu of the forum or topic you want to edit and click Edit Forum(or Topic).
- Make your changes.
- Click Save and Close.

Group or Section Restricted Topics
Using topic or forum restrictions, you can create discussion areas where members of a group or section can collaborate on assignments or discuss course material in small teams. You can also use restrictions to create separate forums or topics for each group or section in a course offering. To do this you need to have your groups/sections set up before-hand.
- On the NavBar, click Assessments, then select Discussions.
- On the Discussions List page, click on the down arrow next to the forum or topic you want to restrict and select Edit topic (or forum).
- In the Availability Dates & Conditions section, click on Manage Restrictions.
-
Here you will have two options. Select the desired option:
- Restrict Topic - Users in the selected groups/sections can view this topic and all of its threads.
- Restrict topic and separate the threads - Users in the selected groups/sections can view this topic but will only see threads from their group/section
- Then, select the groups/sections that will see the topic.
- Click Add.
- Then Save and Close.
Note: If you selected Restrict Topic, you probably only want one group/section to have access to the topic. If you have several groups/sections, then you will need to create a topic for each group/section a restrict each one individually i.e. there will be a separate topic for each group/section. If you selected Restrict topic and separate the threads, all groups/sections can be selected. Group/section members will only see posts from their other group/section members, but as an instructor you will see all posts under one topic.

Automatically create restricted topics for groups or sections
You can automatically create a discussion topic for each group or section in a selected category. To pick get their names from the group or section they associate with.
- On the navbar, click Assessments > Discussions.
- From the tool navigation, click Group and Section Restrictions.
-
Click the Automatically create restricted topics link.

- Select a Group or Section Category and the Forum where you want to create your topics. If you want to create a new forum, click New Forum.
-
Click Create.

Managing and Assessing (grading) Discussions
About Locking and Hiding Discussion Forum and Topics
Locking a topic prevents users from creating new posts or modifying existing posts, making the conversation read only. Users with permission can modify the contents of a locked topic. Locking a topic is an effective way of closing a conversation while allowing users to refer back to posts.
You can specify start and end dates for when a forum or topic unlocks so you can set things up ahead of time to match your course’s calendar.
Hidden topics do not display on the Discussions List page, except to users with permission to see hidden forums and topics or to manage discussions. By hiding topics, you can control which topics users can access at different times throughout the course. For example, you can create weekly discussion topics for users to reflect on the material covered in each week of the course and make each topic available for one week only.
You can specify start and end dates for when a forum or topic is visible so you can set up visibility ahead of time to match your course’s calendar.
Note: Instead of scheduling a topic to disappear as soon as you want the discussion to end, consider locking the topic at that point and keeping it visible for another few days. This allows users to review the discussion after it closes so that they don’t miss the last posts added.
Locking and/or hiding Discussion Forum
- On the navbar, click Assessments > Discussions.
-
From the context menu of the forum you want to lock, click Edit Forum.
-
On the Restrictions tab, select your Locking Options.

- Click Save.
Forum settings will override topic settings. So keep that in mind when setting up start and end dates on forums.
Locking and/or hiding Discussion Topic
- On the navbar, click Assessments > Discussions.
- From the context menu of the topic you want to lock, click Edit Topic.
- In the Availability Date & Conditions section add a start and/or end date.
-
Then, click on Before start (or After end) setting (under the date).

-
Here, select from the three options:
- Visible with access restricted – Students can see the topic and description but cannot access or read posts.
- Visible with submission restricted – Students can access the topic and read posts but cannot submit.
- Hidden – Students cannot see topic.
- Click Done.
- Repeat these steps for the end date as well if you’ve set up both start and end dates.
- Click Save and close.
Moderating discussion topics
If a topic requires post approval or moderation, posts only appear to users with permission to approve them. You must manually approve these posts to make them visible to all users. Users with permission to approve posts in a topic can create approved posts automatically.
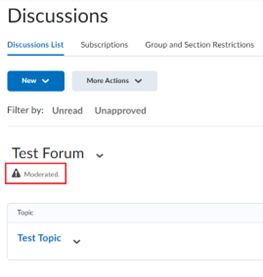
You can enable and disable post approval when creating or editing a forum or topic. Once you enable post approval, a  Moderated notification appears beside the forum or topic name.
Moderate discussions
You must manually approve posts and threads in topics that require approval. Once you approve a post or thread, it is visible to all users. To hide the post or thread, you must unapprove it.
To moderate discussions
-
You can moderate discussions from the Forum level, which will push down to any topic nested under that forum, or at the topic level. Go to Assessments > Discussions, then either:
- Forum Settings - Click the down arrow on the Forum you want to add the Moderating setting on to and select Edit Forum, then select A moderator must approve individual posts before they display in the forum. Save and Close.
- Topic Settings - Click the down arrow on the topic you want to add the Moderating setting on and click on Edit Topic. Go to the Post & Completion section and select Posts must be approved before they display in the topic. Save and Close

- To moderate and approve (or unapproved) posts, do any of the following:
- Beside the post you want to approve, click the Approve Post link.
-
From the context menu of the post you want to approve, click Approve Post.

- To approve all posts in a thread, click Approve All Replies in Thread.
- From the context menu of the post you want to unapprove, click Unapprove Post.
- From the context menu of the thread you want to unapprove, click Unapprove Thread.
Assessment methods available for a Discussions
There are several different assessment options available to you in Discussions. A description of each option is described in the table below.
Calculation methods available to assess individual discussion posts.
| Calculation method | Definition |
|---|---|
| Average post score | This calculation method averages all of the post scores included per user. |
| Maximum post score | This calculation method identifies the highest score of all the post scores included per user. |
| Minimum post score | This calculation method identifies the lowest score of all the post scores included per user. |
| Mode post score - Highest on multiple | This calculation method looks at the frequency of scores on posts, then selects the highest occurrence of a score per user. Once it picks the frequency, the system looks to see if multiple scores occur at that frequency. If not, it assigns that score to the user. If there are multiple scores with the same frequency, it will choose the highest of those scores. For example, if a score of 7 occurs 2 times, a score of 8 occurs 3 times, and a score of 9 occurs 3 times, the system will choose the frequency 3 and the score of 9. |
| Mode post score - Lowest on multiple | This calculation method looks at the frequency of scores on posts, then selects the highest occurrence of a score per user. Once it picks the frequency, the system looks to see if multiple scores occur at that frequency. If not, it assigns that score to the user. If there are multiple scores with the same frequency, it will choose the lowest of those scores. For example, if a score of 7 occurs 2 times, a score of 8 occurs 3 times, and a score of 9 occurs 3 times, the system will choose the frequency 3 and the score of 8. |
| Sum of post scores | This calculation method sums up all the scores on posts within a topic. |
Configuring a topic assessment
- On the navbar, click Assessments > Discussions.
- Click the down arrow of the topic you want to configure for assessment, click Edit Topic.
-
To associate the topic to the Gradebook, add a Grade out of point value, then click on In Grade Book. Select Edit or Link to Existing, then select Link to an existing grade item (if the grade item has already been set up in the Gradebook) and select the appropriate grade item OR Create and link to a new grade item (if the grade item has not been set up yet). Click ok when complete.


- In the Evaluation & Feedback section, configure how you will assess the topic by doing any of the following:
- Click the Add Rubric button to attach one or more existing rubrics, or click the Create Rubric in New Window link to create a new rubric for the topic. You can assess one or more rubrics for each learner in the course, and learners can view completed, published rubrics in Class Progress, Grades, Content, Discussions, and User Progress.
- If you want to score individual posts, select the Allow assessment of individual posts check box, then select your calculation method to allow assessment of individual posts in the topic. Note:When this check box is not selected, you can give a single overall score to the learner for their participation.
- If you want to score all the posts within a topic, select the Allow assessment of individual posts check box, and then select the Sum of post scores calculation method.
- If you select Allow assessment of individual posts, the Include unassessed posts in the calculated topic score as zero check box becomes available. When you select this check box, the system automatically assigns a score of zero to individual posts that you have not yet evaluated, and the overall score for the learner is calculated from the score of all posts, including those not evaluated with a score of zero. Selecting this check box does not affect the Sum of post scores option. If you do not select the Include unassessed posts in the calculated topic score as zero check box, posts without a score are ignored and do not factor into the overall score
-
Click Save and Close.

Assessing Discussion Threads
You can assess learners' participation in discussion topics from within threads for topics to which you have added an assessment. In the Assess Post pop-up, you can view the post you are assessing, along with any attached rubrics and fields to add in personal feedback.
- From Assessments, click Discussions.
- On the Discussions List page, click the topic you want to assess.
-
You can assess an individual learner while viewing all of a learner's posts together on one screen. Click the context menu beside a thread name and select Assess Student.

-
In the popup dialog box, do any of the following:
- If assessment of individual posts is enabled, enter a score in the Score column beside each post you want to assess.
- If assessment of individual posts is not enabled, enter a score in the Topic Score field. This score is the assessment you are providing to the learner for participation in the topic
- Complete each rubric, choosing a level and entering feedback for each criterion. The Total calculates automatically based on the rubric criteria, or you can manually enter the Total and override the calculation. Note that the calculated or chosen Total is automatically populated in the Topic Score field. To return the Topic Score to the calculated score from the rubric, click Clear Override.
- In the General Feedback field, enter feedback comments.
- Click Save Draft to retain the assessment results and publish later. Click Publish to immediately release the assessment results to the learner in Assignments, Discussions, Grades, Content, and User Progress simultaneously.
Assign scores to users from the Assess Topic Page
You can assess users from inside a discussion topic while reading posts, or from the Assess Topic page. When assessing users from the Assess Topic page, you can see topic scores for all users and view all of a user’s posts together on one screen.
Assessable topics display an Includes assessment icon beside the topic name on the Discussions List page.
To assess individual posts, you must edit the topic to enable the Allow assessment of individual posts check box in the Assessments tab.
- On the navbar, click Discussions.
- From the context menu of the topic you want to assess, click Assess Topic. If the Score column is empty on the Assess Topic page, click Manage Columns, select the Score Value check box, and click Save.
-
Do one of the following:
- In the Users tab, click Topic Score for the name of the user you want to assess.
- In the Assessments tab, click the name of the user you want to assess.
-
In the Topic Score Details window, do any of the following:
- If Allow assessment of individual posts is enabled, enter a value in the Score column beside each post you want to assess
- If Allow assessment of individual posts is not enabled, assign a value in the Topic Score to reflect the learner's participation in the whole topic.
- Complete each rubric with a level and feedback for each criterion.
- In the General Feedback field, enter any comments that you have.
- Click Save Draft to retain the assessment results and publish at a later time. Click Publish to immediately release the assessment results to the learner in Assignments, Discussions, Grades, Content, and User Progress simultaneously.
Best Practices
Best practices for Using Discussions
-
Ensure that there are discussion topics created for your discussion forum(s).
Forums are used to group topics into predetermined themes, course units, etc. You can only post in discussion topics. If there are no topics created for a forum, then students will not be able to participate in discussions.
On the course home page, click Discussions. Make sure that there are topics nested under the discussion forum. If you do not see topics nested under the discussion forum(s), you must create topics. -
Ensure that discussion forums and topics are not unintentionally hidden.
The option to hide a discussion forum or topic is located on the Discussion List page, in the context menu for each forum or topic. The Hidden icon appears beside any topics or forums that are currently hidden. Forums and topics can also be hidden on the New Forum or New Topic page (or the Edit page for existing forums and topics), at the bottom of the page near the Save and Close button.
If you selected Hide this [topic or forum], then learners cannot see it. If a discussion forum has this setting enabled, all of the topics nested under it are also hidden. -
Ensure that there are no unwanted date restrictions set for the discussion forum or topic.
Students cannot access topics that fall outside of set date restrictions. If a discussion forum has date restrictions attached, then all topics nested under it will be hidden outside of those date restrictions.
The option to set date restrictions is located on the New Forum or New Topic page (or the Edit page for existing forums and topics), in the Availability Dates & Conditions section. Select the Forum is visible for a specific date range check box, then fill out your start and end dates. If you want the forum or topic to be currently visible, ensure that the End Date has not passed yet and the Start Date has already begun; if you want it to be available at a later time, set the date restrictions accordingly.
If you do not want date restrictions enabled, keep the Start and End dates blank. -
Ensure that the appropriate group restriction settings are applied.
If group restrictions are enabled for the discussion forum or topic, then only students within the group selected can see the discussion.
The option to set group restrictions is located on the New Forum or New Topic page (or the Edit page for existing forums and topics), in the Availability Dates & Conditions section. Select Manage Restrictions to enable group restrictions for a forum or topic, select the group or section you want to add then click Add.


