Content Tool Overview
About the Tool
Use the Content tool to post and organize course content. Post information like course expectations, course syllabus, lecture notes, and important dates for learners.
Course materials you post in Content can include documents, images, media files, Zoom recordings, URL links, and existing course activities. You can add release conditions, grade items, and learning objectives to topics to ensure users navigate through course materials while fulfilling specific course requirements and learning expectations.
You can also monitor class and user progress as students work through course content by setting automatic (determined by the system) or manual (determined by the student) completion tracking.
Content Page Overview
- When users access a course’s Content page for the first time, the first page they land on is the Overview. Use the Overview page to orient users to the course, content materials, and course expectations. If you decide not to add anything to this page, the Overview link and page is hidden from learner’ view.
- Topics you bookmark appear in a list on the Bookmarks page. The number beside the Bookmarks link indicates how many bookmarks you have. Bookmark links are personal, so links that you bookmark will not be seen by students.
- The Course Schedule page lists course materials due dates, start dates, end dates, overdue course activities, and other course events for the next seven days. If you set availability dates or due dates for course objects, it appears in the Course Schedule page and the agenda view in the Calendar tool. The dates listed on this page are not exclusive to content topics; upcoming events include all events within the course from the Calendar tool. The number beside the Upcoming Events link indicates how many upcoming events you have.
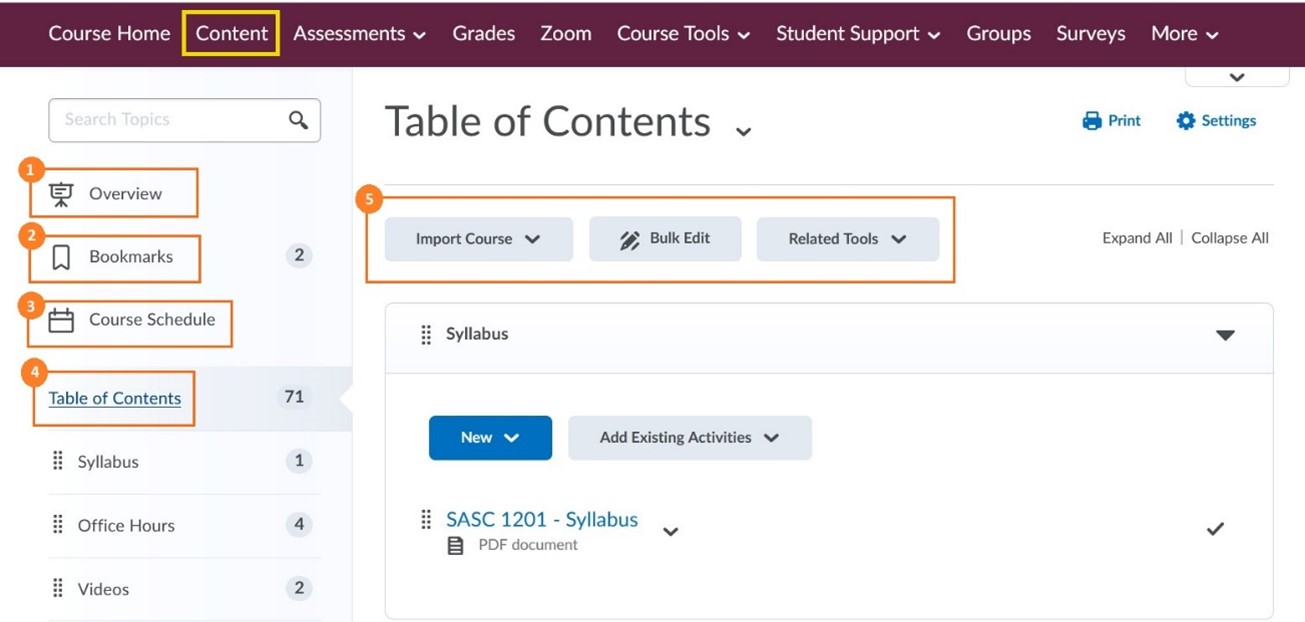
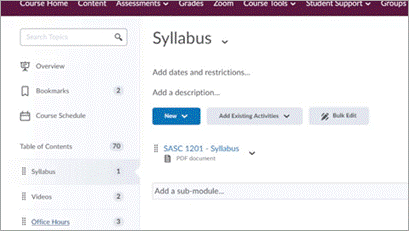
- The Table of Contents panel lists all modules available in your course. The number beside each module name in the Table of Contents panel indicates the number of topics you have set completion tracking for. Use the number totals to determine the task load being put on learners per module.
- The course content administration options on the Table of Contents page allow instructors to import and copy course content, bulk Course Admin content properties, manage course files, view reports on course content, and restore deleted course items.
Course Organization
Your course content is organized using content topics and modules. Use modules to organize the units of your course offering (ex. Week 1, Week 2, etc.) and topics to organize the content of each module (ex. Lesson 1, Lesson 2, etc.).
To learn more click and open the accordions below.
How to Create a New Module and Add Content
You must create a module before you can add topics . You can alsocreate submodules (modules within existing modules) to establish a deeper hierarchy.
To create a module:
- On the Navbar, click on Content
- In the Table of Contents panel, in the Add a module field, enter the name of your new module, and then press Enter.
- To add a submodule, click into the module. In the Add a sub-module field, enter the name of your new sub-module, and then press Enter.
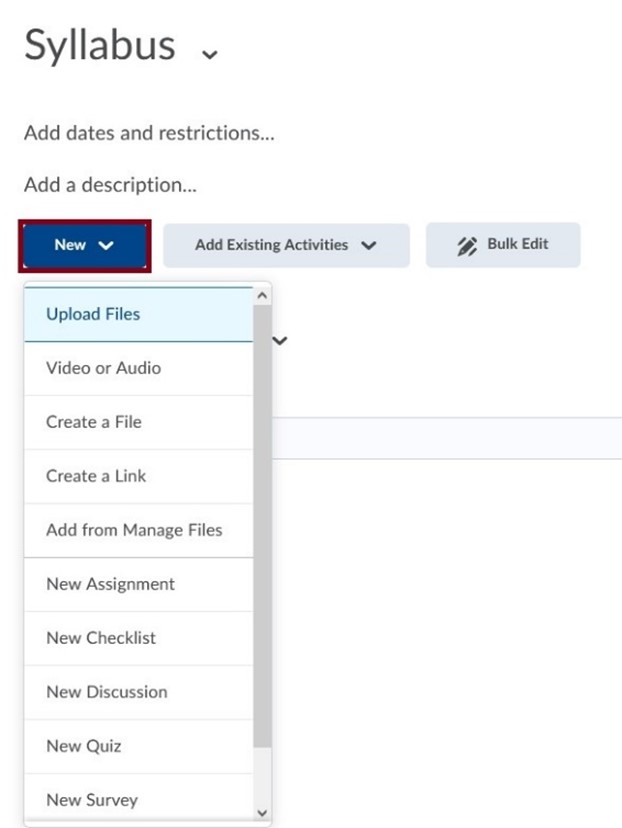
- To add course content (topics) to your new module, click on the module in which you want to create a new topic.
- From the New drop-down menu do one of the following:
- To add a video or audio topic, click on Video or Audio
- To add existing file from your computer, course offering files, or Shared Files area, click Upload Files.
- To create a new webpage, click on Create a File. Here you can use HTML templates to create course content directly on Brightspace.
- To add a link, click Create a link.
- To add existing files from Manage Files, click Add from Manage Files.
- To add a new checklist, click on New Checklist
- You can also add and create new Assessment tools directly from the Content page. You can always edit and access theses assessments from the Assessments link on the Navbar, after you've set them up in Content. The students will also have access to these assessments from Assessments and Content.
- To add a new Discussion topic, click New Discussion
- To add a new assignment, click New Assignment
- To add a new quiz, click New Quiz
- To add a new Survey, click New Survey.
- Follow the prompts on the screen to modify your new topic.
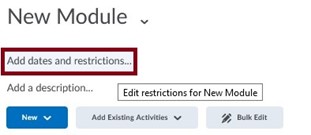
- To Add dates and restrictions to your module, click on Add date and restrictions. Here you can add a start and end date for when you would like students to have access to the specific module. You can also add Release Conditions.
- Click on Add a description to add a description or intro to the module on the Content page.
- You can also add existing objects to the module. Click on Add Existing Activities. From here you can add: Discussions, links to External Learning tools (e.g. McGraw-Hill Connect, Pearson My lab, OneNote), Quizzes, Assignments, Surveys, Etc.
How to Edit, Delete or Hide Content
To Edit Content:
To edit the order of content modules or topics, click and hold the icon with 8 small squares  next to the item and drag the item to the desired location.
To Delete Content:
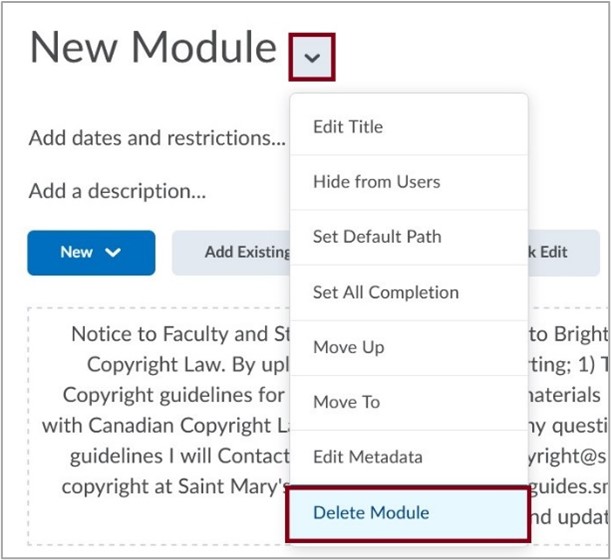
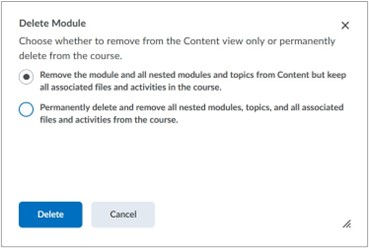
To delete a module, click on the module from the Table of Contents to open it. Click on the down arrow next to the module name and select Delete Module. Determine if you only want to remove the module from Content or permanently delete and remove it from the course. Select the appropriate option and click Delete.
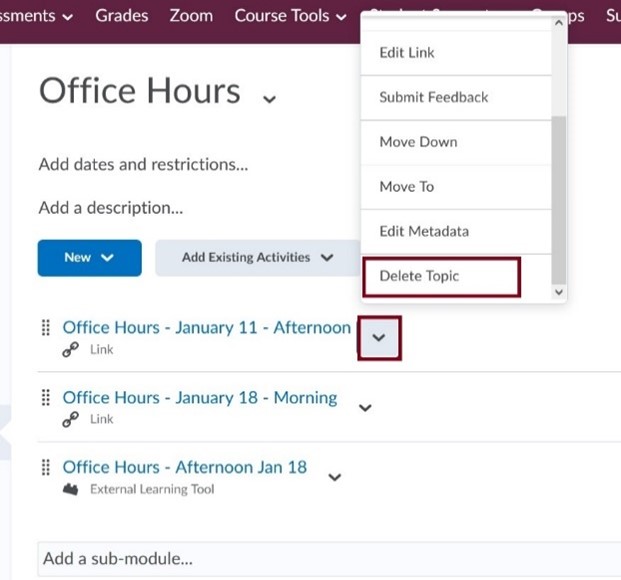
To delete a content topic, click on the down arrow next to the topic and select Delete Topic. Determine if you only want to remove the content topic from Content or permanently delete and remove it from the course. Select the appropriate option and click Delete (see screen shot above for example).
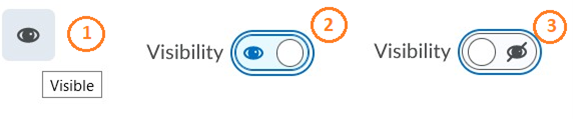
To Hide Content:
- Click on the down arrow next to the module or content topic and select Hide from Users, or
- Select the visibility icon from the topic or module. A visibility toggle appears to allow you to change between Visible and Hidden.
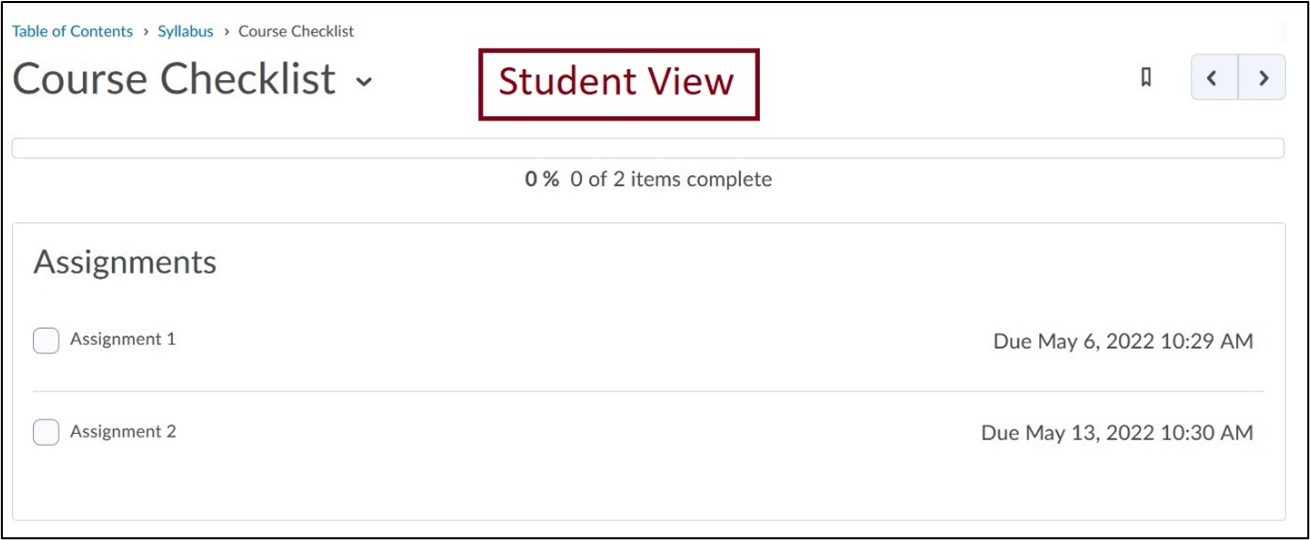
Previewing Course Content as a Student
To Preview your course Content as a Student:
- In Brightspace, click on the course that you want to work with.
- Click on your name (top-right), then on View as STUDENT.
- Navigate to any part of your course to see what your students will see. Note: This view is not always accurate but works well to view Content.
- All done! To return to your normal view, follow the same steps, and click on the small X next to Viewing as STUDENT.
Copy Course Content from a Previous SMU Course
- In Brightspace, click on the course that you want to copy content to.
- Click on the Course Tools drop-down menu (top-right) and select Edit Course.
- Under Site Resources, click on Import/Export/Copy Components.
- Click on Copy Components from another Org Unit.
- Click on Search for Offerings, search by CRN or course name, choose the course, and click on Add Selected. Note: Only courses that you are registered in as an instructor will appear in the search.
- Click on Select Components and select the desired components from the list. Click on Continue.
- Select individual components, if necessary, and then click on Finish.
- All done! Once the transfer is complete, your content will be displayed in the respective sections of the current Brightspace course.
Importing Course Content from a ZIP file or another University
- In Brightspace, click on the course that you want to copy content to.
- Click on the Course Tools drop-down menu (top-right) and select Edit Course.
- Under Site Resources, click on Import/Export/Copy Components.
- Click Import Components and click Start.
- Click upload. Select the .ZIP file you created from your previous course. Click Open.
- Finally, click on Import all Components. Once completed, all the course components included in the zip file will be added to your course.
Creating a Checklist
- In Brightspace, click on the course that you want to work with.
- Click on Content.
- Click on the Module to which you wish to add content or click the Add a Module textbox below Table of Contents.
- To create a new Checklist, select New Checklist from the New drop-down menu. Enter a title for the Checklist and enter instructions if desired. Select Publish.
- On the next page, select Add a New List to create your content. Now, you can name your list by selecting List 1, and begin adding tasks by selecting Add a New Task.
- To edit your first Checklist item, click on Task 1. You can also Add Due Date and Add a Description for the specific task. More tasks can be added to your Checklist by selecting Add a New Task.
- A Checklist can be further modified by clicking on it within course content.