Groups
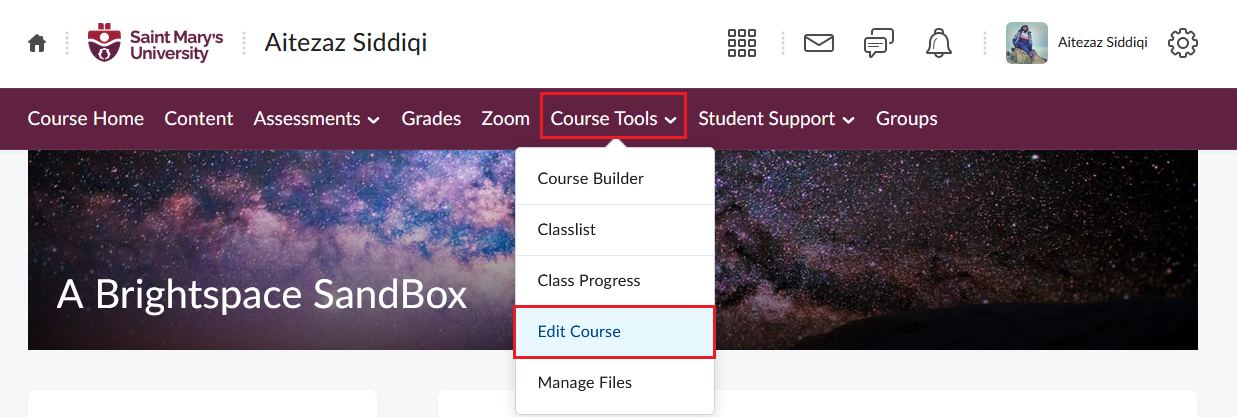
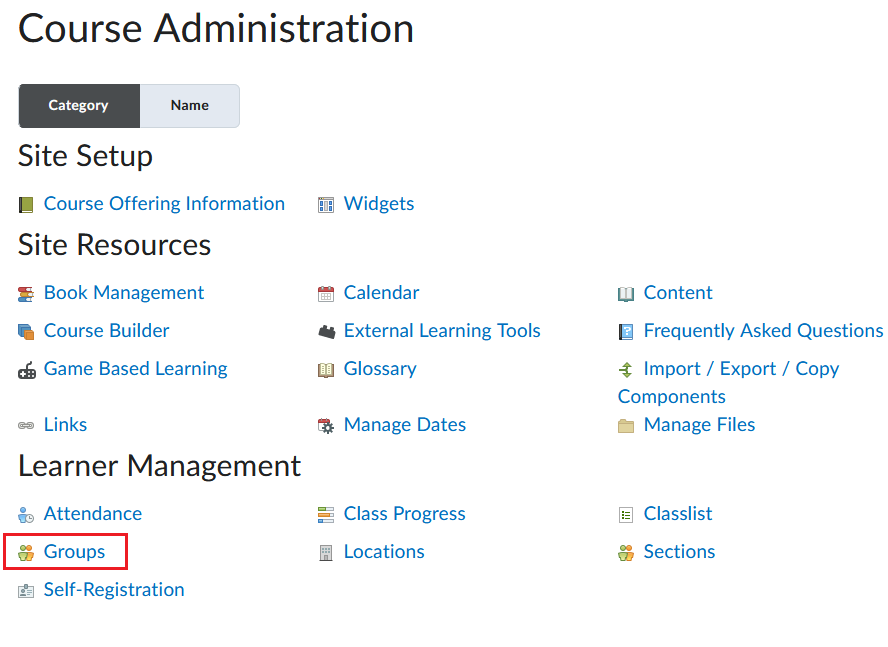
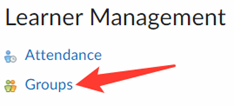
The groups tool can be used to organize users’ work on assignments and projects or for creating a special work area for users with different learning needs. To access the Groups tool, go to Course Tools > Edit Course and select Groups from the Learner Management sub menu.
Important: Groups have a maximum enrollment of 200 users. If there are more than 200 users in a course, you can create new group categories; there is no limit on the number of group categories in a course.
Please contact the Software and Application Support Centre at sas@smu.ca to have the Groups button added to your navbar.
Creating Groups Category
Create categories to set up, organize, and manage related groups.
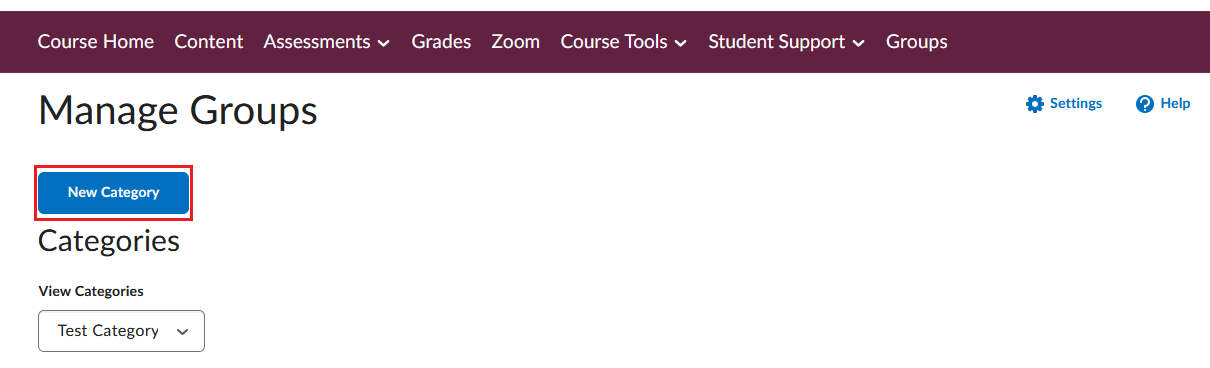
- On the navbar, click Groups.
- On the Manage Groups page, click New Category.
- Enter a Category Name and Description.
-
Select an Enrollment Type from the drop-down list.

- # of Groups – No Auto Enrollments: This option enables you to choose the number of groups with no automatic enrollment feature. So, users would have to be manually put into the groups.
- Groups of #: This option allows you to set the numbers of users per group. Therefore, the number of groups will be automatically created based on how many users there are if auto enrollment is selected.
- # of Groups: This option allows you to set the number of groups. Therefore, the number of users will be distributed evenly amongst the groups if auto enrollment is selected.
- e Groups of # - Self Enrollment: This option allows you to choose the number of users per group, thus, the number of groups created will be dependent on the number of users.
- # of Groups, Capacity of # - Self Enrollment: This option enables you to choose both the number of groups and the number of users per group.
If you want to know more details about the different enrollment types, go to this link.

-
After choosing an Enrollment Type, you can give a distinctive code/prefix to each group name. If this option is left blank, the prefix will default to ‘Group.’ Meaning, the names of all the groups would be whatever the prefix is set as with a number beside it (starting from 1).

-
Under Advanced Properties, few options will only be available depending on the Enrollment Type chosen. Example –
-
If option a is chosen from the Enrollment Type, you will have one checkbox option.
- Make category and group descriptions visible to group members: Checking this box will allow the group members to see the category and group descriptions for their group.
-
If option b or c is chosen from the Enrollment Type, you will have three checkbox options available -
- Auto-enroll new users: It will enable the auto-enroll feature and will add new users to the group with fewest users automatically.
- Randomize users in groups: This option will enable the randomization option. It will enroll users into groups randomly if chosen. Otherwise, users will be enrolled based on their order in the Classlist.
- Make category and group descriptions visible to group members: Checking this box will allow the group members to see the category and group descriptions for their group.
-
If option d, e, or f is chosen from the Enrollment Type, you will have two checkbox options available.
- Set Self Enrollment Start Date: If this checkbox is checked, users will not be able to self enroll themselves before the start date.
- Set Self Enrollment Expiry Date: If this checkbox is checked, users will not be able to self enroll themselves after the expiry date. You also have the option to check the Allocate unenrolled users after Self Enrollment Expiry Date checkbox if you want unenrolled users to be automatically enrolled randomly in a group. This checkbox/option will only work after the self enrollment expiry date passes. It also adds group members beyond the capacity of groups, if applicable. The automatic enrollment recurs at a set interval after the expiry date to ensure that all users are assigned to a group.
Note: If neither the start nor the expiry date is checked, the groups will always be available for enrollment. Instructor can also manually enroll students even if self enrollment option is selected.
-
If option a is chosen from the Enrollment Type, you will have one checkbox option.
-
Under Additional Options, you can create separate workspace for the each of the groups. You can check the Set up discussion areas or the Set up assignments checkbox to create a separate discussion area or create assignment, respectively.
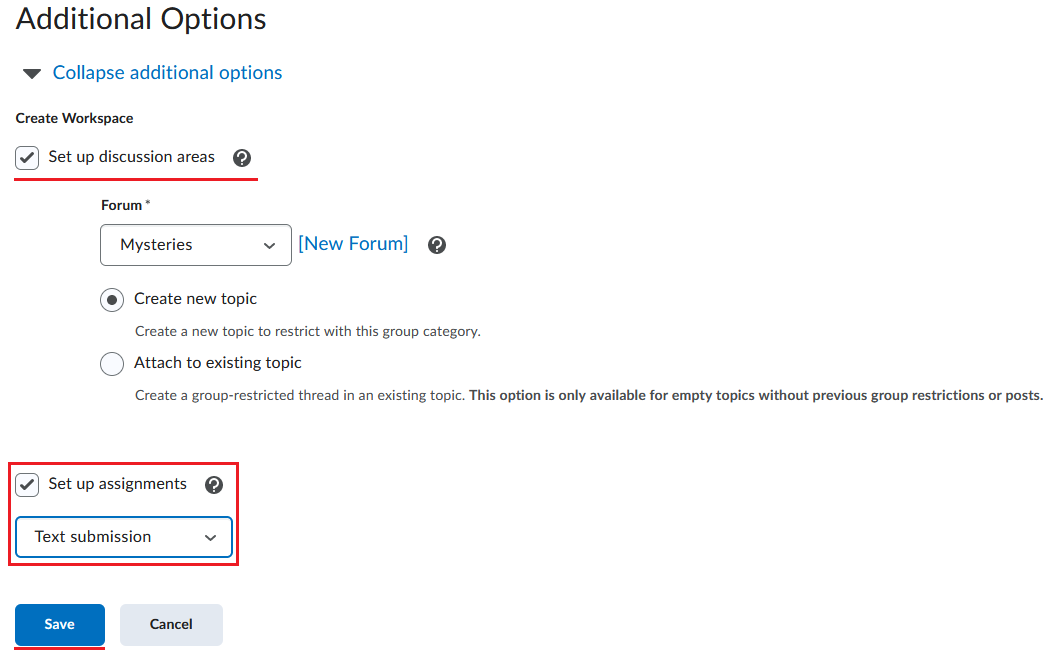
You can limit the assignment submission if you check the Set up assignments box to file, text, on paper submission or observed in person submission types. If you do choose to set up an assignment by checking the box, you will be taken to the Create Assignments page to complete the assignment creation process.
Tip: Enable the options in the Create Workspace area only after you have customized your group names. The discussions areas are then created with the customized group names right away, and you do not have to edit their names manually later.
Assigning Students or TAs to Groups
The way to enroll TAs into groups depends on whether they have access to all groups or only select groups. TAs should have access to all groups if they are responsible for mediating, grading, and working on material for the entire class. They should have access to select groups if they are only responsible for mediating, grading, or working on material for a particular group.
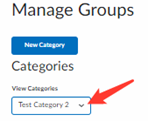
- On the Manage Groups page, select the category from the View Categories drop down list.
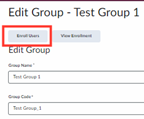
- Click the group you want to enroll users in.
-
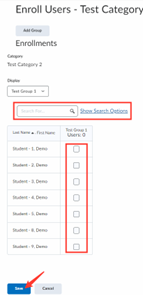
Click the Enroll Users button.
- Select the check boxes next to the students’ names to add them to the group or you can search for students in the search box.
- Click Show Search Options to filter students by Enrolled or Not Enrolled
-
When done click the blue Save button.
- Repeat the process with the other groups.
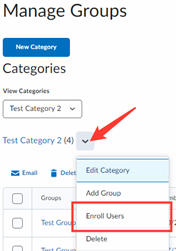
Note: Alternatively, In the Manage Groups page, select the category from the View Category drop down list. Click the drop-down arrow next to your category name and click Enroll Users. In the following page you can see a table with every user and every group. You make changes by clicking the checkboxes to add/remove students or TAs in groups.
Changing Group or Category Names
To change a category name:
-
From the Manage Groups page, click the drop-down arrow next to your category name and click Edit Category.

- Change the name in the Category Name field.
- Click the blue Save button when done.
To change a group name:
- Click on the group from the Manage Groups page
- Change the name in the Group Name field.
- Click the blue Save button when done.
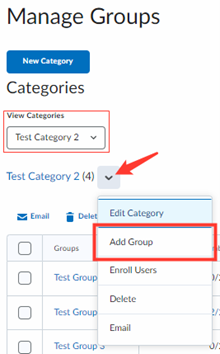
Adding a Group to a Category
To create a new Group in a category:
- On the Manage Groups page, from the View Categories drop-down list, select the category you want to add a group to.
- Click the drop-down arrow next to your category name, click Add Group from the drop-down list.
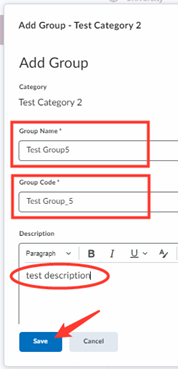
- If you do not want to use the default name provided, enter a group name.
- If you do not want to use the default group code provided, enter a group code.
- Enter a description for the group.
-
Click Save.
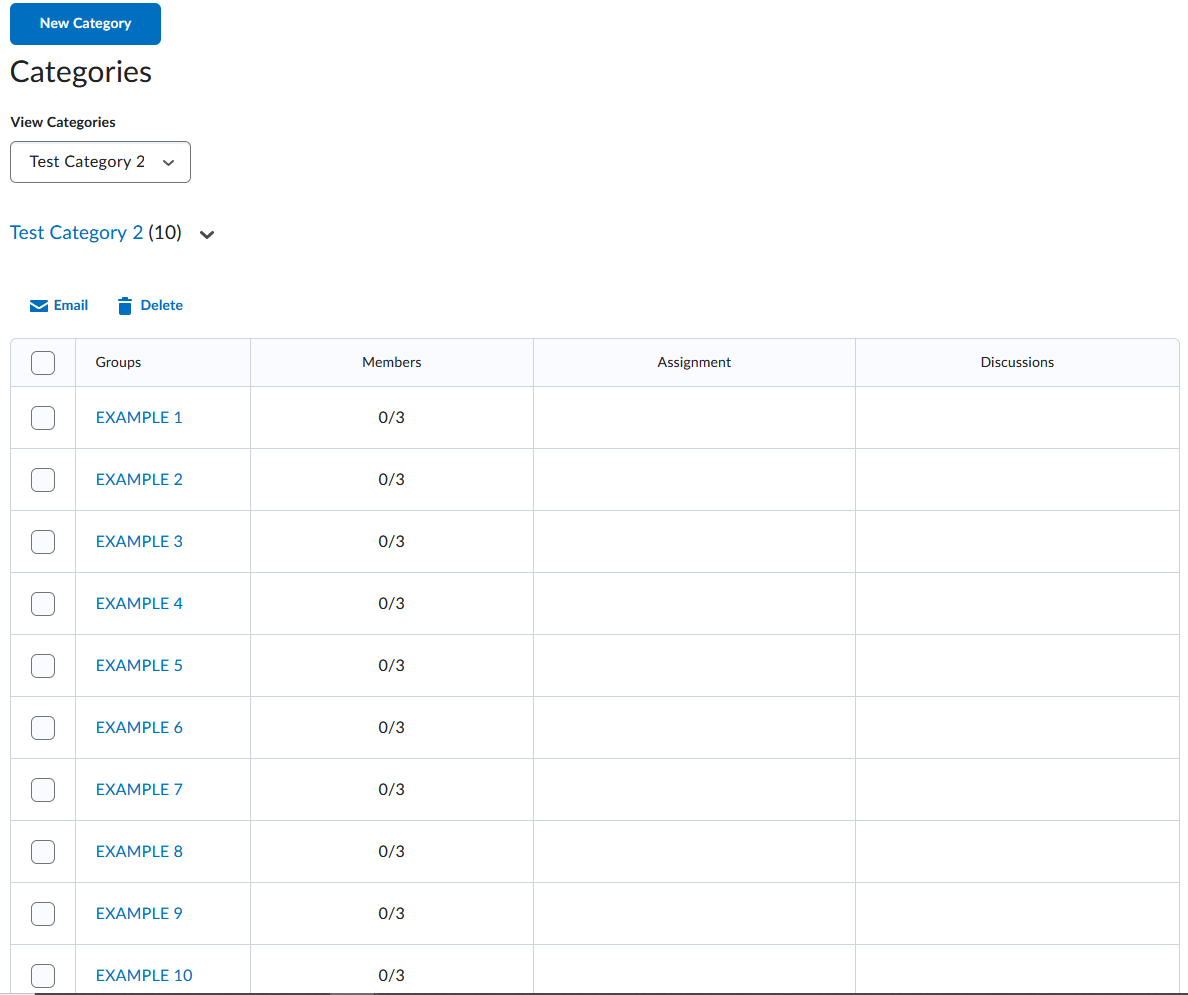
Manage your Groups
View your Groups Categories and Groups
From your course home page, click the Groups button on the navbar. Alternatively, click Course Tools, select Edit Course from the drop-down menu and in the following page click Groups in the Learner Management section.
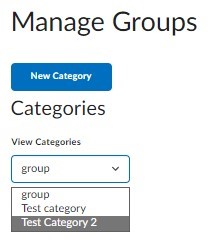
Now in the Manage Groups page you can view your categories from the View Categories drop down list.
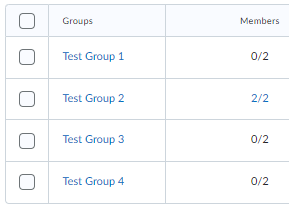
Click on the category you want to view and the groups in that category will appear below.
Edit Categories
In the Manage Groups page, from the View Categories drop-down list, select the category.
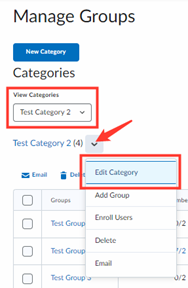
Click the drop-down arrow next to your category name and select Edit Category.
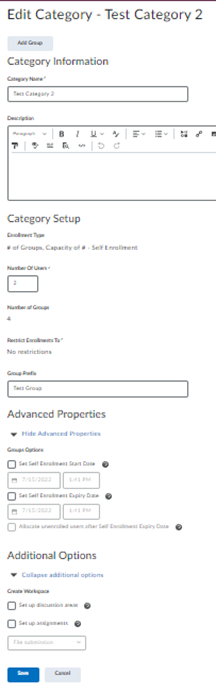
In the following page you can edit the category name, description, group prefix, enrollment start and expiry dates, the option to create workspace and some enrollment options depending on the enrolment type you preciously selected.
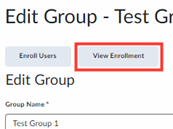
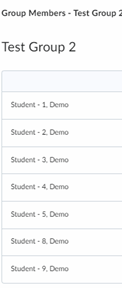
Check Which Students are Enrolled in What Group
In the Manage Groups page, select the category from the View Category drop down list. Click on the group you want to check from the list below. Click the View Enrollment button to see a list of students in the selected group. Repeat the process with other groups to see the students in other groups.
Alternatively, In the Manage Groups page, select the category from the View Category drop down list. Click the drop-down arrow next to your category name and click Enroll Users. In the following page you can see a table with every user and every group. You make changes by clicking the checkboxes to add/remove students or TAs in groups.

Delete Categories
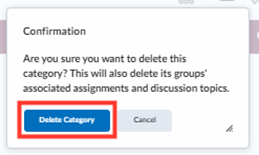
In the Manage Groups page, select the category from the View Category drop down list. Click the drop-down arrow next to your category name and click Delete. Click the blue Delete Category button.
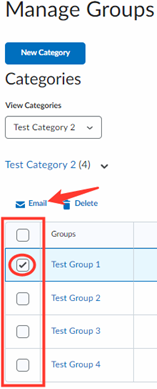
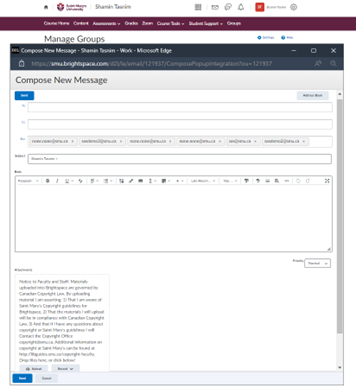
Send an Email to all Students in a specific Group
In the Manage Groups page, select the category from the View Category drop down list. From the list of groups below, select the checkbox of the group you want to email and click the blue Email button. A new pop-up window will appear where you can compose your email.