Intelligent Agents
Intelligent Agents is a tool in Brightspace that assists faculty and acts on their behalf by allowing them to delegate work that they could have done. Intelligent Agents automate email notifications that can help faculty when defined activity occurs in a course or a lack of login or course activity.
An Intelligent Agent can send an email for:
- The student hasn't accessed your course for a specific number of days
- The student hasn't logged in to Brightspace for designated number of days.
- The student has opened (or not) a content page.
- The student has authored (or not) a discussion post.
- The student has earned (or not) a particular grade or award.
To Create an Intelligent Agent
- From the course Navbar, click Course Tools, then select Edit Course.
- Click on Intelligent Agents, near the bottom of the page.
- On the Agent List page, click New.
- On the New Agent page, enter a name.
- If you want to assign a category to the agent, select an option from the Category drop-down menu.
- You can create a new category by clicking the Add Category link to the right of the Category drop-down menu. Enter a name in the Name field, and then click Save.
- Enter a description in the Description field, if required.
- If you want the agent to be active, select the Agent is enabled check box.
-
To schedule how frequently agent criteria is evaluated, choose a frequency option from the dropdown menu and complete the schedule dates and repitition options as needed.
Note: Intelligent Agents can be scheduled to run before the course start date. Scheduled agents stop running and are automatically disabled if the course is inactive, past its end date, or deleted. You can still set up a practice run or a manual run of an intelligent agent at any time in a course with a passed end date.
-
Expand Criteria, and under Role in Classlist do one of the following:
- If you want the intelligent agent to be applicable to all roles in the Classlist, select the All users visible in the Classlist check box.
- If you want the intelligent agent to be applicable to select roles, select the Users with specific roles check box and select the respective roles.
-
If you want your agent to target users' login habits, under Criteria > Login Activity enter your criteria.
Note: Login activity refers to logins at the platform level.
- If you want your agent to target users' course habits, under Criteria > Course Activity, enter your criteria.
-
To set an intelligent agent based on specific release conditions, do one of the following:
- If you want your agent to run when a specific existing condition has been met, under Criteria > Release Conditions, click Attach Existing. Select the condition you want and click Attach.
-
If you want your agent to run when a specific new condition has been met, under Criteria > Release Conditions, click Create and Attach. Select a Condition Type from the drop-down list. Complete any additional Condition Details that appear and click Create.
For example, you can create and agent that acts against users who have been enrolled in a course for a certain number of days, either based on the first or last time they were enrolled into the course.
Note: All criteria selections under Take Action on Activity, which include the criteria Login Activity, Course Activity, and Release Conditions, are optional selections.
- Under Actions > Repetition, select how often you want the agent to take action.
- If you want the agent to send an email when the set criteria are satisfied, expand Actions, and under Send an Email, select the Send an email when the criteria are satisfied check box and enter you email details and relevant attachments.
- Click Save and Close.
Performing a Practice Run
You can test out your Intelligent Agent by performing a practice run.
- To navigate to the Intelligent Agent page, click on Course Tools, then select Edit Course. Click on Intelligent Agents (near the bottom of the page).
- Locate the agent you wish to test, then click o the down arrow to expand the menu.
- Select Practice Run.
- You will be prompted in a pop-up window to confirm that you want to complete a practice run. Click Run.
-
You will see a Practice Run Agent Confirmation page confirming that you request has been submitted. An email will be sent to you when the request is completed and you will then be able to view the practice run result.
Note: If the agent is set up to send emails to students, a practice run will not send out these emails, but will still identify the users that satisfy the criteria.
- Click Done to return to the Agent List page.
- Locate the agent and click # users identified in the Results of Last Run column to view your results report.
Running an Intelligent Agent Manually
Agents are typically set up to run automatically as long as you have enabled a schedule in your agent settings. You also have the option to manually run the agent of no schedule has been set.
- To navigate to the Intelligent Agent page, click on Course Tools, then select Edit Course. Click on Intelligent Agents (near the bottom of the page).
- Locate the agent you wish to test, then click on the down arrow to expand the menu.
- Select Run Now.
- A pop-up window will appear prompting you to confirm that you want to manually run the intelligent agent. Click Run.
- You will see a Manual Run Agent Confirmation page confirming that your request has been submitted. You will receive an email when the request is completed.
- Click Done to return to the Agent List page and view your results.
- Locate the agent and click # users identified in the Results of Last Run column to view your results report.
Using Replace Strings in Intelligent Agent Emails
Emails that are sent out by Intelligent Agents can be personalized. Replace Strings allow instructors to customize course content and communications in Brightspace by integrating the intended learner's personal information, such as their name, automatically in specific areas.
What are Replace Strings
Replace strings, sometimes referred to as display configuration variables, are configuration variable names enclosed in curly bracket {} that are automatically replaced by the corresponding configuration variable values. For example, if you enter the test {OrgUnitID} into a document, when you view the document you will see the Organizational Unit ID of the course.
Replace Strings can be used in all tools that use the Brightspace Editor.
Creating replace strings within Intelligent Agent Emails
In the Intelligent Agent email setup, you can use replace strings to personalize your emails.
Replace Strings available to use in Intelligent Agent emails
| Replace String | Description | For Use In |
|---|---|---|
| {InitiatingUser} | The user who performs the action that meets the agent’s criteria | Email address field |
| {InitiatingUserAuditors} | The auditors for the user who performs the action that meets the agent’s criteria | Email address field |
| {OrgName} | The name of the organization | Email body |
| {OrgUnitCode} | The code for the Org Unit | Email body |
| {OrgUnitName} | The name of the Org Unit | Email body |
| {OrgUnitStartDate} | The start date specified for the Org Unit | Email body |
| {OrgUnitEndDate} | The end date specified for the Org Unit | Email body |
| {OrgUnitId} | The org unit ID required to make quick links works | Email subject line and email body |
| {InitiatingUserFirstName} | The first name of the initiating user | Email body |
| {InitiatingUserLastName} | The last name of the initiating user | Email body |
| {InitiatingUserUserName} | The username of the initiating user | Email body |
| {InitiatingUserOrgDefinedId} | The Org Defined ID of the initiating user | Email body |
| {LastCourseAccessDate} | The date the initiating user last accessed the course | Email subject line and email body |
| {LastLoginDate} | The date the initiating user last logged in | Email subject line and email body |
| {LoginPath} | The address of the login path for Brightspace | Email body |
Example of how to use Replace strings in your Intelligent Agent Emails
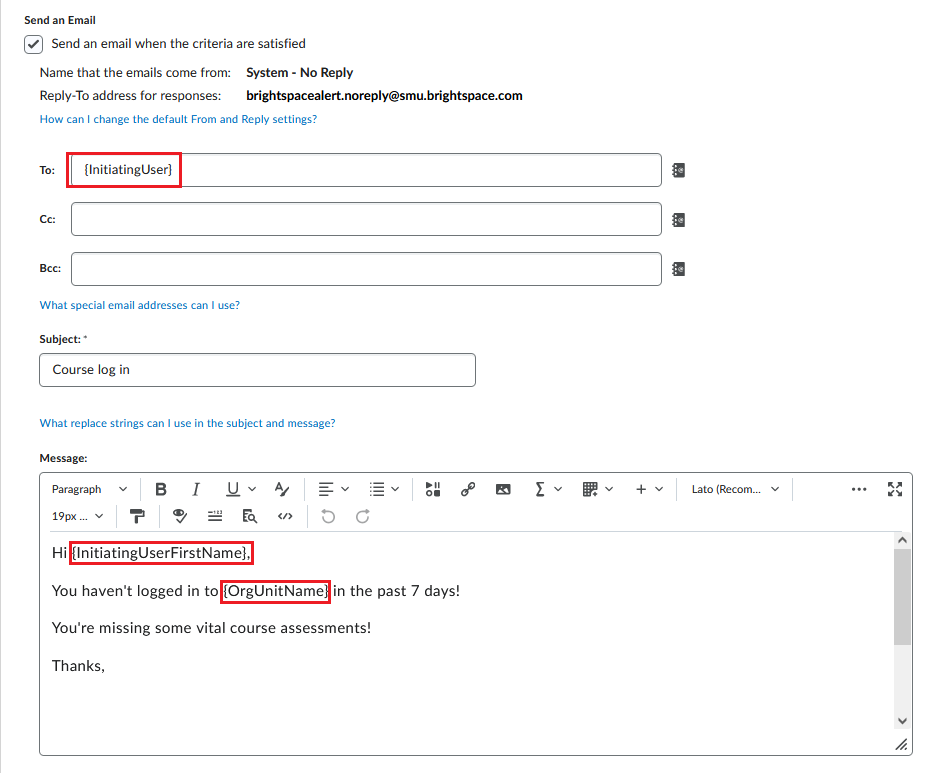
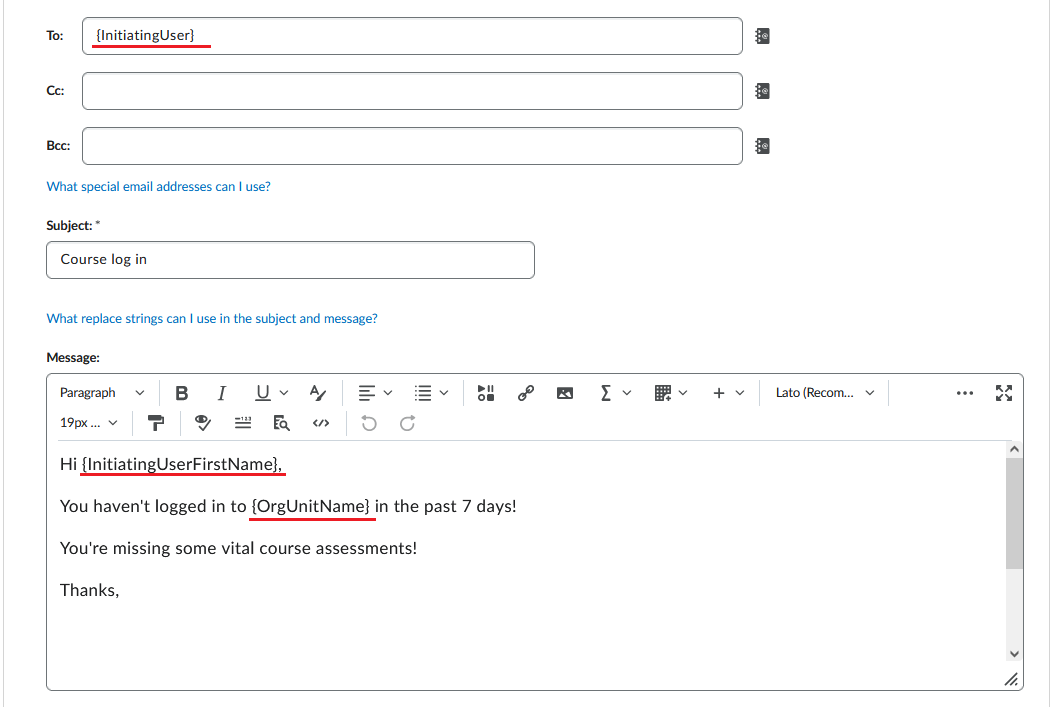
In the image below we can see three different replace strings being used:
- The instructor is using the replace string {InitiatingUser} in the TO: field. This is pull the email address of the users that is satisfying the agents criteria.
- In the body of the email, the instructor is using {InitiatingUserFirstName} to personalize the email. This will add in the users first name into the email.
-
And finally, the instructor is using {OrgUnitName} to add in the name of the course in the email.
Note: In this case you could just as easily type out the name of the course in the email, but the idea here is that you can copy the intelligent agent into another course and you will not have to edit the body of the email..
Intelligent Agent Example - Early Assist
Scenario:
You would like to email all the students that have not logged into your course since the beginning of term.
- In your course, go to Course Tools > Edit Course.
- Scroll down to the bottom of the page and select Intelligent Agents.
- Click on New Agent.
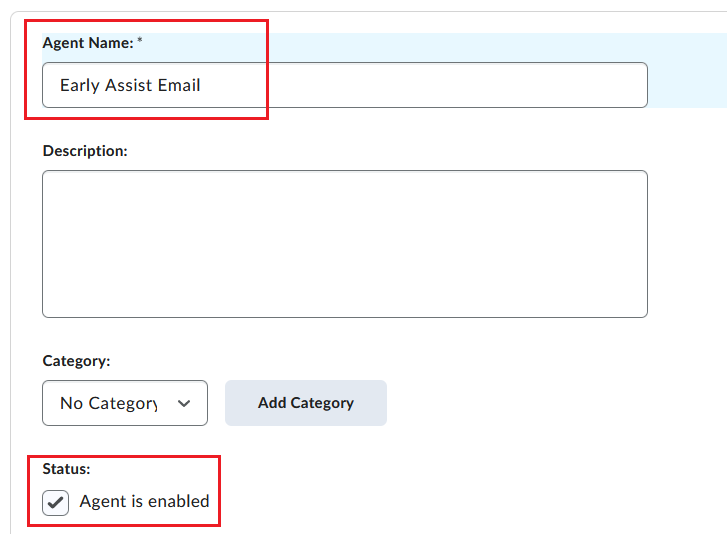
-
Name it (ex. Early Assist Email), and select Agent is enabledAgent is enabled.
-
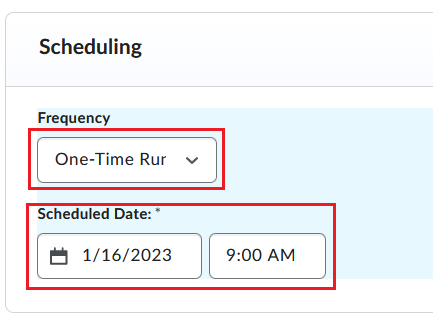
Under Schedule:
- Select One time run.
- Then, schedule the date you would like the agent to run.
-
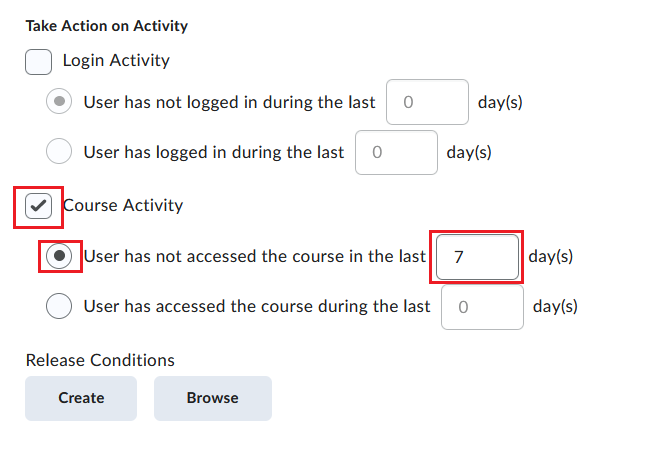
Under Criteria:
- Select Users with specific roles, then select student.
- Click Course Activity, the select User has not accessed the course in the last (blank) day(s) and fill in the # of days.
-
Under Actions:
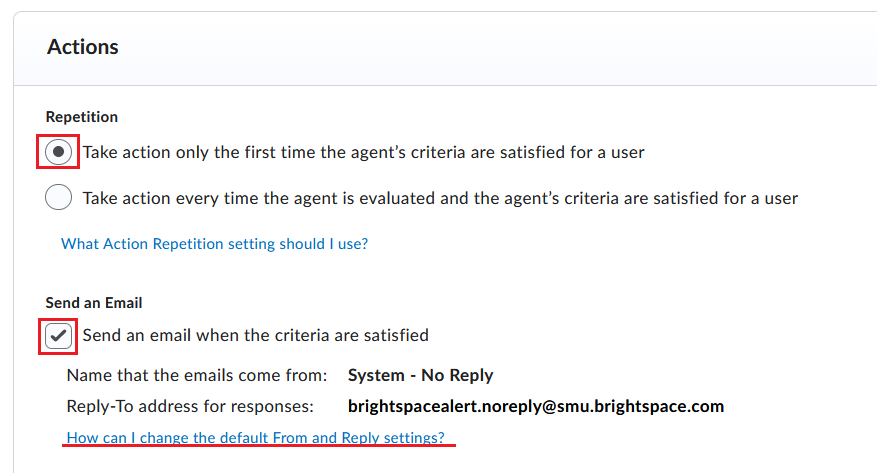
- Select Take action on the first time the agents criteria are satisfied for a user..
- Select Send an email when the criteria are satisfied. Click on the link How can I change the default From and Reply settings, get info on how to change the settings to display your own email.
-
Compose your email. Add in replace strings to personalize the email message.
- Save and Close when you are done.


