Intro to Microsoft Streams
Uploading & Sharing a Video on Microsoft Stream
Microsoft Stream can be used to share access to videos within SMU. Videos cannot be downloaded by viewers, and owners can restrict access to individuals or groups. Here is how to upload and share a video to Microsoft Stream. If you have any questions about using Microsoft Stream, please contact the Software & Application Support Centre via email at sas@smu.ca.
Accessing Stream
- Navigate to Office website.
- Sign in with your @smu.ca email address and password
- On the left navigation bar, select the All-Apps button at the bottom left corner.
- Select the pink Stream icon. Microsoft Stream will open in a new browser tab.
Stream (Classic)
Stream Classic is retiring on 15th of April, 2024. Microsoft will fully disable Stream Classic and videos on the classic portal will be deleted and SMU will have no control over it after this date. Please start downloading your videos from Stream (Classic) and upload them to the new Stream on SharePoint or another location such as a Team.
Uploading a Video to Stream (Classic)
- Click Create on the top menu bar.
- Select Upload video from the drop-down menu.
- Click browse and follow the prompts on your screen to upload a file from your device or OneDrive storage.
- Select the language of your video by choosing the appropriate language from the Default video language drop-down menu.
- If your video does not already have closed captions, click on the Options tab and select the Autogenerate captions check box.
- Your upload will then process. When the video is finished processing, above the Details tab you will see Processing complete, ready to publish. This may take several minutes depending on the length of your video.
- Click Publish.
- Once your video is published, you will need to add appropriate permissions so others can view the video. You will also need to generate a link to share the video. See the sections below Sharing a Video with Individual People on Stream for instructions if you wish to share the video with a small number of people, or Creating a Group on Stream and Sharing a Video with a Group on Stream if you wish to share your video with a larger group of people (i.e., students in a class).
Adding Captions to a Video on Stream
Microsoft Stream will auto-generate captions for any video. Here's how to enable auto-captions for a video you’ve already uploaded:
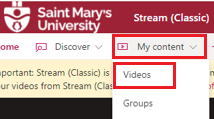
- Click on My content on the top menu bar.
- Select Videos from the drop-down menu.
- Locate the video that you'd like to share. To the right of the video preview there are a series of icons. Click on the Pencil icon to edit the video details.
- Under the Details section, navigate to the Video Language drop-down menu. Select the appropriate language from the drop-down menu.
- Under the Options section, make sure the Autogenerate captions checkbox is selected.
- Click Apply at the top of your screen.
- Depending on the length of your video, it may take upwards of 30+ minutes to generate your captions. Please leave this tab open in the background while you wait. Once your captions have been generated, you will see a live transcript of your video in the Transcript box next to the video.
Sharing a Video with Individual People on Stream
- Click on My content on the top menu bar.
- Select Videos from the drop-down menu.
- Locate the video that you'd like to share. To the right of the video preview there are a series of icons. Click on the Pencil icon to edit the video details.
- Under the Permissions section, ensure that the Allow everyone in your company to view this video checkbox is NOT selected (if this option is selected, everyone at SMU will be able to watch your video).
- Under Share with, type the name of the individual with whom you'd like to share the video in the Search for People search bar.
- Click on the Magnifying glass icon and select the proper name from the list that appears.
- If you do not want the individuals with whom you are sharing the video to be able to edit the video details, ensure that the Owner checkbox next to their name is NOT selected.
- Click the Apply button at the top of the screen. Please note that the video has NOT yet been shared with anyone – you have simply given those individuals selected in steps 5-6 permission to view the video once you share it with them by following steps 9-13.
- You will be redirected to the video. Under the Details section below the video, select the Share icon (arrow pointing out of an L shape).
- If you'd like to copy the link to the video and paste it in another location (such as a Teams chat or email), click the Copy button and paste it to your desired location.
- If you'd like to have Stream send an email to the individual, select the Email tab and type the name of the individual in the Search people and groups text box.
- Select the proper name from the list that appears and click Add.
- Click Send and close.
Creating a Group on Stream
If you will need to share multiple videos with the same group of people, you can create a Group on Microsoft Stream to avoid having to add viewing permissions and share the video with each person individually every time. Groups on Stream are Microsoft 365 Groups, which means if you create a Group on Stream you can also access the same Group in other Microsoft 365 applications. Here's how to create a Group on Stream:
- Click on the Create button on the top menu bar.
- Select Group from the drop-down menu.
- In the Name text box, type a name for your group (for example, the name of your class)
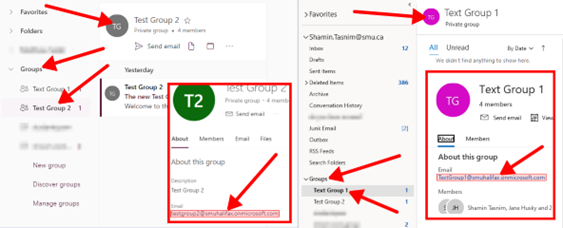
- Once you've entered a Group name, Stream will auto-generate an email address for your Group in the Email address text box. If you'd like to edit the email address, you can add alphanumeric characters. If you're only using this Group to share access to videos on Stream, you will not need to use this email address.
- If you'd like, you can also write a short description of the group in the Description text box.
- Under Default settings, ensure the Privacy is set to Private.
- Click the Create button at the bottom of the window.
- Add members to your group in the Add members text box. You will need to type each name/email address individually and select the appropriate person from the drop-down menu. You must use @smu.ca email addresses to add members to a Group.
- If you'd like specific members of the group to have the ability to edit group membership and videos, you can change their permission level to Owner by selecting the arrow next to the word Member and selecting Owner from the drop-down menu. Owners can remove members from the group, delete the group, and have full control of any content shared with your Stream Group. Members can simply view the content shared with the group.
- Once you've added each member to the group and modified their Group permissions appropriately, click the Add button at the bottom of the window.
Sharing a Video with a Group on Stream
- Click on My content on the top menu bar.
- Select Videos from the drop-down menu.
- Locate the video that you'd like to share. To the right of the video preview there are a series of icons. Click on the Pencil icon to edit the video details.
- Under the Permissions section, ensure that the Allow everyone in your company to view this video checkbox is NOT selected (if this option is selected, everyone at SMU will be able to watch your video).
- Under Share with, select My groups from the drop-down menu.
- In the Search for your groups search bar, type the name of your Group.
- Click on the Magnifying glass icon and select the proper Group name from the list that appears.
- If you do not want the members of the Group with whom you are sharing the video to be able to edit the video details, ensure that the Owner checkbox next to their name is NOT selected.
- Click the Apply button at the top of the screen.
- You will be redirected to the video. Under the Details section below the video, select the Share icon (arrow pointing out of an L shape).
- If you'd like to copy the link to the video and paste it in another location (such as a Teams chat or email), click the Copy button and paste it to your desired location.
- Click Close.
Download a Video from Stream (Classic)
-
Click on My content and then Videos on the top menu bar.
-
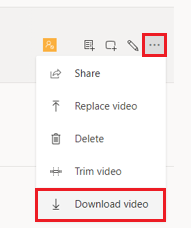
Click the 3 dots(…) next to the video you wish to download, and then select Download Video.
-
Depending on which browser you are using, it may ask you where you wish to download the file. Repeat step 2 for every video you wish to download.
Note: This process may take awhile depending on your internet connect, the length of the video, and the number of videos that you need to download.
Stream (on SharePoint)
Uploading a Video to Stream
-
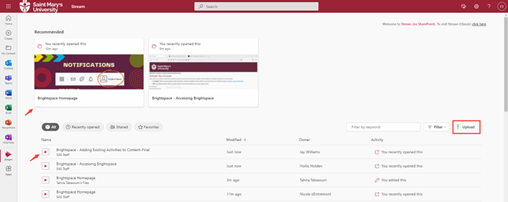
This is the Stream homepage where you will find all the videos that you have uploaded. To upload a new video, select Upload. Once uploaded, it will show up under All. The list at the bottom will show you the Name, when it was last Modified, Owner of the file as well as the Activity.
Note: If you have your OneDrive sync option turned on for your computer, downloading any file from the web will automatically upload them to your OneDrive as well as your Stream SharePoint. In that case, you can simply open Stream SharePoint and access the file without uploading it. Stream is also the default video player for videos in your OneDrive.
Note: When you upload a video on your Stream, it will ask you for a location. If you choose the location to be your OneDrive, you will see the video on the root directory of OneDrive. Hence, you can find it on both your OneDrive and on Stream.
-
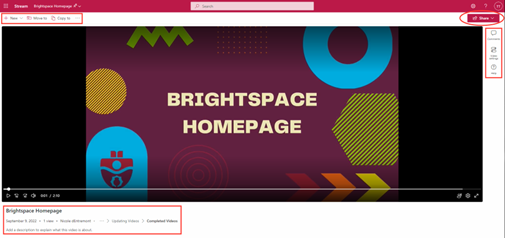
When you open the video, you will be able to Move, Copy, Download, Share, insert Comments, change Video Settings, and Add a description as shown in the picture below:
-
New will let you add a new Recording (It will open on a new window. You can use your Camera, Record screen or Record mic only) or you can also Upload a new video (it will open your file explorer to choose your file). After you upload the file you will be able to open it and it will redirect you to a new page where you will be able to edit the video.
 Move to option lets you move the file to different locations in Teams. Copy to option lets you copy the file to different locations in Teams. If you click on the three dots at the top left, you can download the file from there.
 Share option has four different ways you can share the video:
-
Share the link: A small new window will pop up and you can either share by sending the link by selecting people or group or you can copy the link and manage their access.

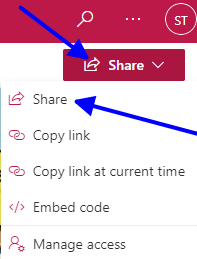
- It will give you the option to Copy the link, Copy link at current time, Embed code as well as Manage access.
-
Share the link: A small new window will pop up and you can either share by sending the link by selecting people or group or you can copy the link and manage their access.
Adding captions to a video on Stream
- After uploading your video to Stream, open your video and on the right-side pane click Video Settings.
-
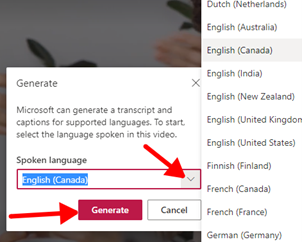
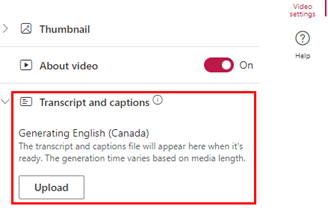
Click the small arrow beside Transcript and Captions to expand the section. If you already have a caption file on your device, click Upload, navigate, and select your caption file. If not, click Generate.
-
Click the arrow and select the spoken language in the video. Click Generate.
Note: The generation time varies based on media length.
-
When it’s done generating captions, each individual user can click the “CC” button
 on the bottom right of the video player to toggle caption on/off while the video is playing.

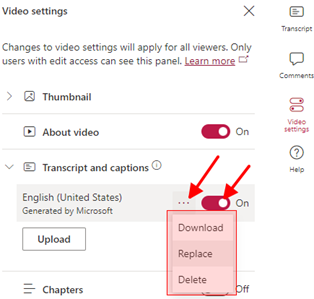
- On the right-side pane, in Video Settings you can turn caption on/off for the video (if you turn if off here, no one will see captions while watching the video).
-
You can click the 3-dot menu to Download, Replace or Delete the captions.
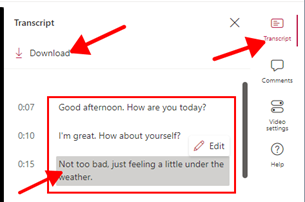
- On the right-side pane, click Transcript. Here you can scroll and read/edit the entire transcript.
- Click each line to edit the transcript.
- Click the Download the button to download the transcript.
- You can also Download the Transcript, open and edit it in Notepad and upload it back in Video Settings > Transcript and Captions > Upload.
- Multiple captions/subtitles can be added to a video.
Sharing a video with individual people on Stream
-
Click and open the video you want to share.

-
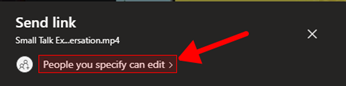
Click the Share button at the top right corner and click Share from the drop down.
-
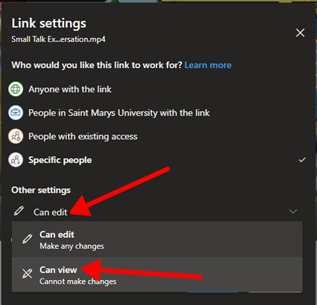
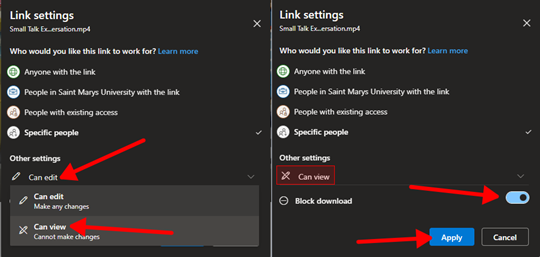
Click People you specify can edit. Click Can edit and select Can View from the drop down.
-
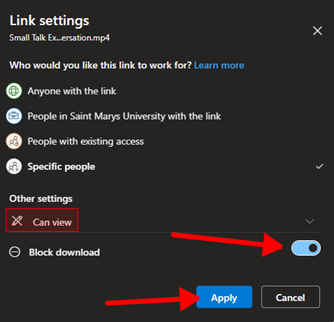
Toggle on Block Download and click Apply.
-
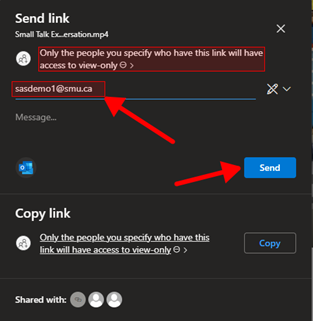
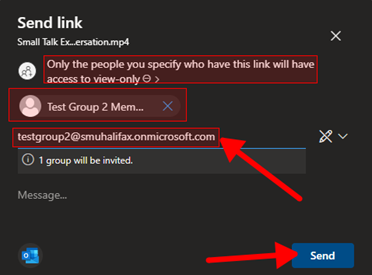
In the To field, type in the email of the person you want to share the video with, and the click Send.
Stream with Outlook
Creating a group (in Outlook) – To share with entire class
-
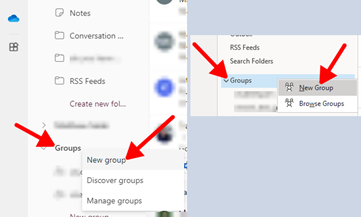
In either the Outlook desktop app or Outlook on the web (using a browser), right click Groups and select New Group.
-
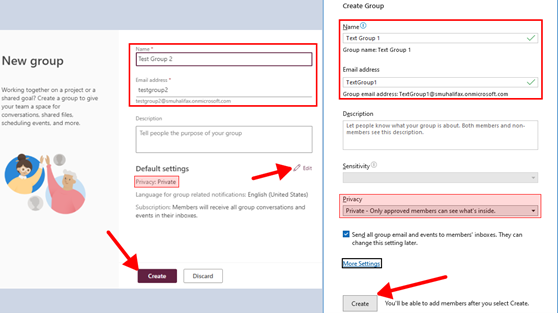
In either the Outlook desktop app or Outlook on the web (using a browser), Type in a name for the group. Edit email address for the group if you want to (optional). Type in a description (optional). Privacy should be Private by default; if not, set it to private. Click Create.
-
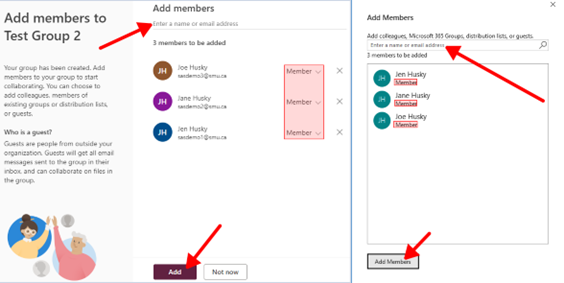
Type in the email of your group member and press enter on your keyboard. Type in the name of a second member and press enter. Repeat. Make sure everyone is a member. Click Add/Add members when done.
Alternate method to invite students in an Outlook group
- Create an Outlook group following the same steps mentioned above. You may choose to not add members by typing in email addresses as you will sending out an invite link to the members.
- On the left side pane, expand the Groups folder; click and open your group.
-
If you are using -
-
Outlook on the web:
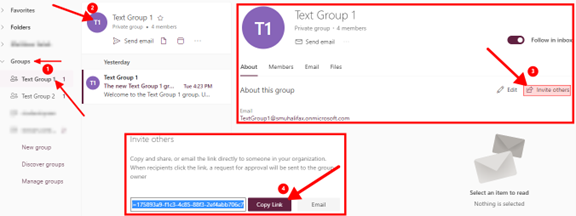
- Click on your group’s picture and a new window will pop up.
- When a new window pops up, click Invite Others.
- Click Copy link.
-
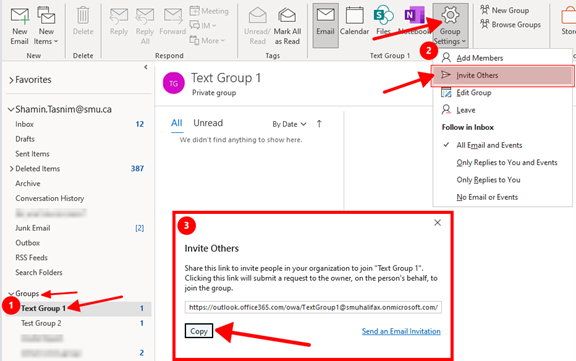
Outlook Desktop app:
- Click Group Settings on the top ribbon.
- Click Invite Others from the drop-down list.
- Click Copy.
-
Outlook on the web:
- Now, you can paste in the group invite link in a Brightspace News Item/Content post or email out the invite link to your class list.
When your students have requested access to the Outlook group via the invite link you sent out, you will have to accept them.
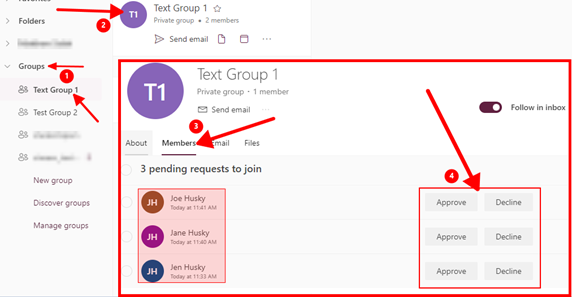
- On Outlook on the web (through a browser), on the left side pane, expand the Groups folder.
- Click and open your group.
- Click on your group’s picture and a new window will pop up.
- Click the Members tab.
-
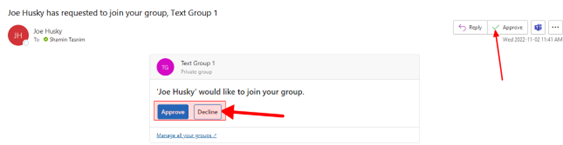
Now you will see the list of people who requested access to your group. You can scroll through the list and Approve or Decline their request.
-
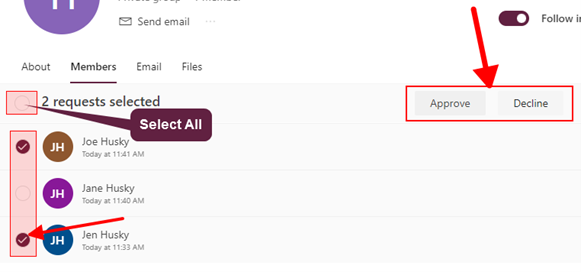
You can also select the multiple people by clicking the radio button beside their names or select all by click the top left radio button and decide to Approve or Decline the selected ones at once.
-
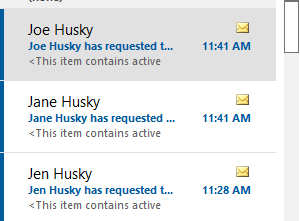
You will receive an email for every person who requests access to your group.
-
You can also Approve or Decline their request by clicking the appropriate buttons in the emails.
- On the Outlook Desktop app, as of right now, you can only Approve or Decline requests by clicking the appropriate buttons in the emails.
Sharing videos with an Outlook Group
- Open Outlook desktop app or Outlook on the web.
- On the left side pane, expand the Groups folder; click and open your group.
- Click on your group’s picture and a new window will pop up.
- Copy your group’s email address.
-
Go to Stream. Click and open the video you want to share.
-
Click the Share button at the top right corner and click Share from the drop down.
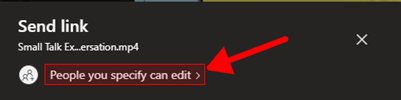
- Click People you specify can edit. Click Can edit and select Can View from the drop down.
-
Toggle on Block Download and click Apply.
- In the To field, paste in the email of group, and the click Send. The video will be shared with everyone in the group.
Sharing multiple videos with a group
- Put all the videos you want to in a folder on your OneDrive.
- Right click the folder and click Share.
- Follow the same steps mentioned above; by setting it to can view, blocking download and typing in the email of a group/person.
Privacy Concerns
- When you create an Outlook group, every member of the group can see other group members and their email addresses.
- When a video is shared in any way (from OneDrive, by link, by emails, etc.), if you give someone Can Edit permission, they will have the Manage Access section available where they can see everyone the video is shared with and can also view their email addresses
- When sharing videos, it is recommended to set it to Can View and turn on Block Downloads.


