In Meeting Features
Overview of the Whiteboard Tab
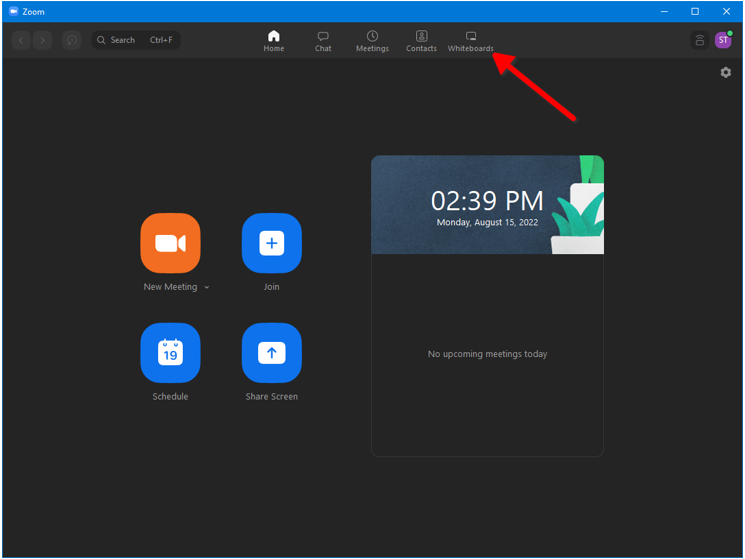
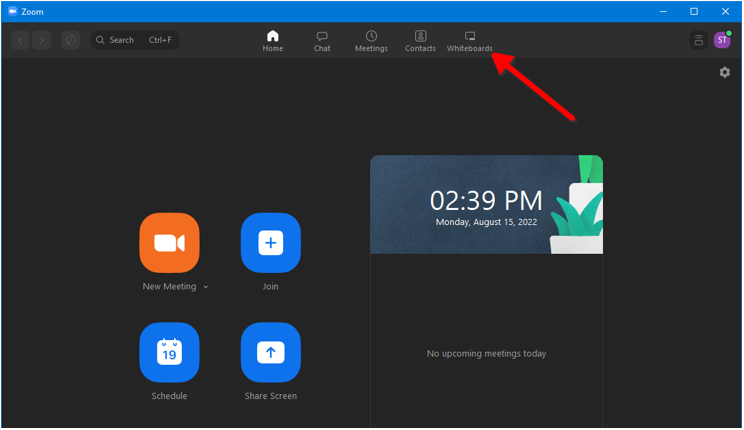
In the Zoom Desktop App, Click the Whiteboard button on the top navbar.
-
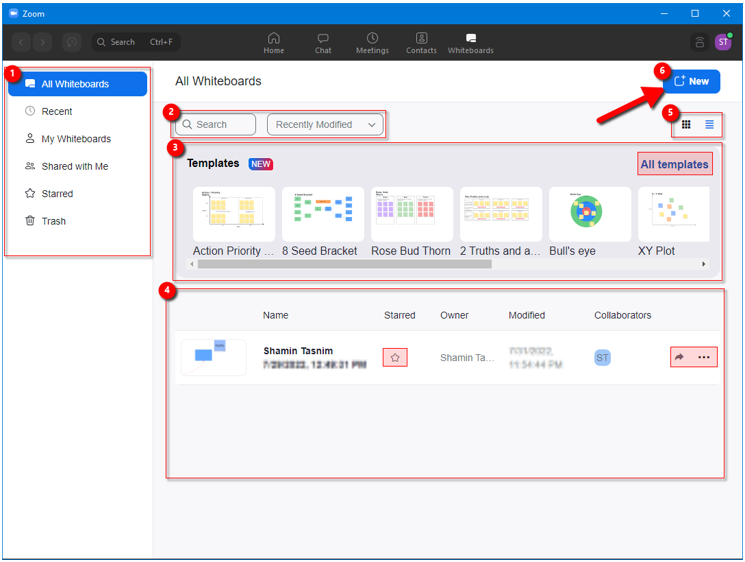
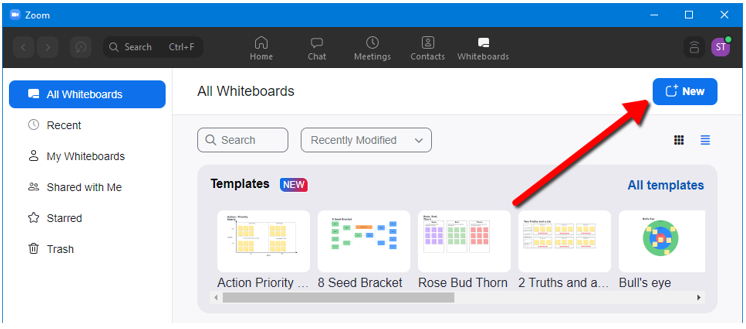
Categories & Folders:
- All Whiteboards- Every whiteboard you have access to.
- Recent- Recently opened whiteboards.
- My Whiteboards- Whiteboards you created.
- Shared with me- Whiteboards others created and shared with you.
- Starred- Whiteboards you marked as starred.
- Trash- Whiteboards you deleted.
- Search & Filter: Filter and search your whiteboards.
- Templates: Choose a template to start working with or click All Templates to browse through all available templates.
-
List:
- Click a whiteboard from list of your whiteboards to open it.
- Click the Star button to mark as starred (important), then you can just go to the starred folder to find it easily next time.
-
Click the arrow/share button to share the whiteboard.
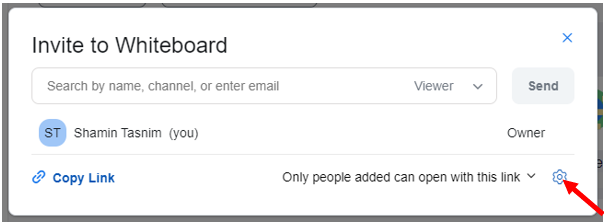
- In the search box type in a name/email of the person you want to share the whiteboard with.
- Click the Viewer Drop down arrow to set a role (permissions) for them.
- Click the send button to send them the whiteboard.
- Click the copy link button to get a link for the whiteboard.
- Click the drop-down arrow on the bottom right of the window to set who can access the whiteboard
-
Click the 3-dot menu for more options:
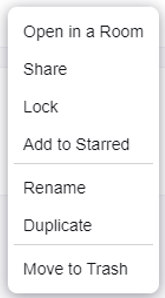
- Click Open in a Room to open the whiteboard in a Zoom Room.
- Click Share to share the whiteboard.
- Click Lock to lock the whiteboard. Only You (the owner of the whiteboard) will be able to access the whiteboard.
- Click Add to starred to mark it as starred.
- Click rename to rename the whiteboard.
- Click Duplicate to make a copy of the whiteboard.
- Click Move to Trash to delete the whiteboard.
- View/Layout: Click these buttons to change the layout to a grid view or a detailed list view
- New button: Click the New button to Create a new whiteboard from scratch
Making a new Whiteboard
- Open the Zoom desktop App.
-
Click on the Whiteboard tab on the top navbar.
-
Click the New button to Create a new whiteboard from scratch.
Opening a Whiteboard in a Zoom meeting
-
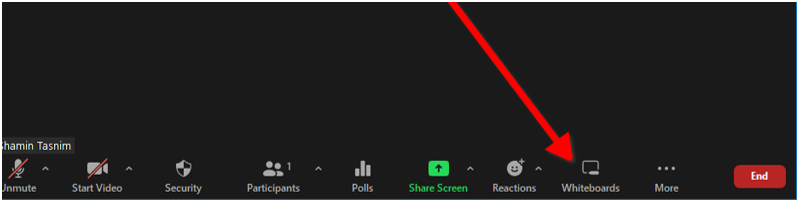
Click the Whiteboard button in the bottom navigation bar.
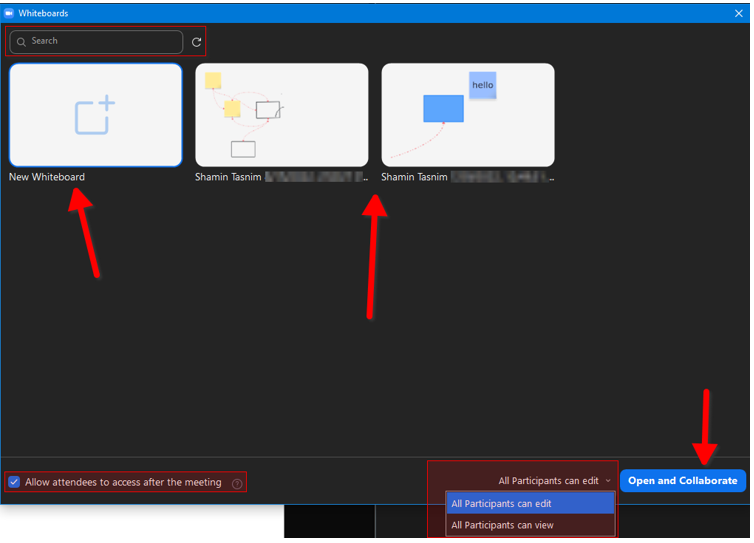
- You can search for your Whiteboard in the search bar at the top left of the window.
- Select one of your previously made whiteboards or select New Whiteboard to create a new one.
- Click the “Allow attendees to access after the meeting” check box on the bottom left to allow meeting attendees/participants to access the whiteboard after the meeting ends.
- Click the “All participants can edit” drop down arrow to select if the meeting participants can edit your whiteboard or just view/see it.
-
When done setting your preferences, click Open and Collaborate to start the Whiteboard within the Zoom meeting.
Whiteboard & Annotation tools overview

- Back Button: takes you back to the Whiteboards Tab.
- Name of your whiteboard: Double click to rename the whiteboard.
-
Annotation Tools:
- Select tool: select, move, or edit items.
- Draw: draw, mark, write etc.
- Shapes: inserts boxes, circles, etc.
- Line: inserts lines and arrows.
- Text: inserts text.
- Sticky note: inserts Sticky notes.
- Templates: browse and select templates.
- Image: inserts pictures.
- Erase: erase or remove item(s).
- Color: change the color of an item.
- Undo & Redo: undo/redo changes.
- Page: open/create another page of the Whiteboard.
- Move: click and drag to move/reposition the annotation toolbar

- Zoom: click the respective buttons to zoom in and zoom out or click the percentage to go back to 100%(default) zoom and recentre the whiteboard page.
- Here you will see the initials of people who have the whiteboard open. Then there is the share button to manage permissions and share the whiteboard. The comment button is for comments and remarks. And finally, the 3 Dot menu has the options to report, lock the meeting or to delete the whiteboard.
Enabling Chat in Settings (Host/Instructors)
If you would like students to be able to send text-based messages in the meeting chat, go to Zoom.us and sign in with your @smu.ca email address and the password you set for your Zoom Pro Account. Click on Settings along the left navigation bar. Scroll to In Meeting (Basic) and ensure the following settings are enabled:
-
Chat
Allow meeting and webinar participants to send chat messages. We recommend that this setting is turned on so that participants and the meeting host can interact with each other. -
Private chat
Allow meeting participants to send direct messages to other participants and allow webinar panelists to send direct messages to other panelists. We recommend that this option is turned on so that meeting participants can interact with each other.Note:ON by Default.
Using Chat in a Zoom Meeting (Host/Instructors, Participants/Students)
-
Click on the Chat
 icon on the meeting toolbar to open the chat window. If you don’t see the Chat icon, click on the More button and select Chat from the drop-down menu.

- Enter your message in the chat window and press Enter on your keyboard.
- While screen sharing in a meeting, click Chat in the meeting controls toolbar. A floating chat window will appear, which is not visible to other meeting participants.
-
If you receive new chat messages while screen sharing, a red icon will appear next to Chat indicating the number of unread messages. Click Chat to open the chat window.
Using Chat in a Zoom Meeting to send Private messages (Host/Participants)
-
While in a meeting, click Chat in the meeting controls.
- From the Todrop-down menu, select the participant you want to chat with directly.
- Enter your message in the chat window.
- Press Enter to send your private message. Your message will appear in the chat window, indicated by a (Direct Message) notification above the message.
Using Reactions in a Zoom Meeting (Host/Participants)
Participants have the option to use different Reactions (emojis, yes, no, slow down, speed up, away as well as raise hand) during a Zoom meeting to communicate with the host.
- To send a reaction, click on the Reaction button on the toolbar along the bottom or top of the screen.
-
If you are using a phone or tablet your reaction button may be hidden – tap the More button and tap on the reaction you would like to send.

Sending files via Zoom chat
During Zoom meeting, you can send files to the participants through Zoom. In order to use that, you need to enable it in your global settings in Zoom.us. The settings can be found under In Meeting (Basic).
Send files via meeting
Host and participants can send files/documents to the in-meeting chat. This feature can be enabled or disabled based on preference.
- Allow only specified file types: You can restrict the file sharing only for some specific file formats (.txt, .doc, .xlsx etc.)
- Maximum file size: You can restrict the maximum file size to share. You can only allow up to 2 Gigabytes of file.
Note: Off by default
-
Click on the Chat icon on the meeting toolbar to open the chat window.
-
Click on the Files
 icon.
icon.

- Then select a file you want to share from your local computer.
Saving Zoom chat
-
Click on the Chat icon on the meeting toolbar to open the chat window.
-
Click on the three dots.

-
Then select Save Chat.

You can also set to auto save chats after every meeting. To set that -
- Go to Zoom.us and sign in with your SMU account.
- From the left navigation panel, go to Settings.
- Under Meeting Settings, go to the section In Meeting Basic.
-
Toggle the option Auto saving chats on.
Note: Off by default.
For Host/Co-Host (Instructors)
Click on the Participants  button on the meeting toolbar to open the participants pane to manage students, view aggregate nonverbal feedback, and invite others to join the meeting.
For Participants (Students)
Click on the Participants button on the meeting toolbar to open the participants pane to see who's currently in the meeting and invite others. You can also access these options by hovering over your display name and clicking More:
- Rename: Change your screen name displayed to other participants.
- Share My Pronouns/Unshare My Pronouns: If you have entered your pronouns in your profile, you can choose to share or unshare your pronouns in the current meeting. This feature requires Zoom version 5.7.0 or higher.
Muting Participants in Zoom (Host/Participants)
Hosts can mute/unmute individual participants or all of them at once. Hosts can block unwanted, distracting, or inappropriate noise from other participants. To do so:
- Click Participants from the panel.
- When the Participants window opens, it will show the list of all meeting participants.
- Move the cursor to the name of the person you want to mute, and the Mute button will appear.
-
Click Mute/Unmute.

Remove unwanted Participants:
You can remove someone from your meeting by using Participants menu. On the Participants menu, you can mouse over a participant’s name (as shown in the previous picture) and several options will appear, including Remove. Click that to remove someone out of the meeting.
When you do remove someone, they cannot rejoin the meeting. But you can toggle your settings to allow removed participants to rejoin in case you removed the wrong person.
Enabling Co-Host in a Zoom Meeting
-
Click Participants in the meeting controls at the bottom of the Zoom window.
- Hover over the name of the participant who is going to be a co-host and choose More.
- Click Make Co-Host.
Adding Alternative Host
You can add someone else as an Alternative Host for the meeting when scheduling a meeting. Alternative host has all the access to the meeting as host and can also start the meeting on behalf of the host.
For Zoom desktop app, click on schedule icon to open the scheduling window. Then click on the dropdown arrow beside Advanced Settings. At the bottom you should see this field to add alternative host.

For Zoom web or Brightspace, click on Schedule a new meeting and scroll down to the bottom of the page. You should see the field to add alternative host there.
You can only add the users who had a SMU Zoom pro license as an Alternative host.
Giving Polling Control to Alternative host
While setting up someone as an alternative host you can select this option.

After that they can launch any poll, you have created and have all other controls.
Pre-set Polls for you Zoom meeting
Pre-set Polls from Zoom website:
- Go to Zoom.us and sign in with your SMU Email and Zoom password.
- From the left navigation panel, go to the Meetings page.
- If you already have your meeting scheduled, click on the Meeting Topic, and scroll down to the bottom of the page. Otherwise schedule a new meeting and open the meeting by clicking on meeting topic.
-
Scroll to the bottom and select Polls/Quizzes.

-
Click + Create to begin creating the poll.

-
Enter a title, questions, and option for that poll. You can also change it to Multiple Response Question.

- Click Save at the bottom after you are done creating a poll.
- Create addition polls by clicking the + Create and giving the poll a new name.
Note: You can create more different types of question if you create and advanced poll. Here is a document Explaining Advanced polling Feature in Zoom.
Pre-set Polls from Brightspace.
-
Go to Zoom from the top navigation panel of your Brightspace course.

- If you already have your meeting scheduled, click on the Meeting Topic, and scroll down to the bottom of the page. Otherwise schedule a new meeting and open the meeting by clicking on meeting topic.
- Scroll down to the bottom to the section Poll.
-
Download the CSV template, add your poll questions there.

-
Then upload the edited file with the quiz using the Import CSV button.

Once you have uploaded you can see all the poll questions under the poll section. You can edit those questions from Zoom web site and launch and share the results from the desktop app normally.
Launch a Poll
-
Click on the Poll
 button on the meeting toolbar in your Zoom meeting.
-
If you have multiple polls, click on the top dropdown menu, and select the other poll from the menu.

- After you do that, you should see a Launch button for the new poll.
-
To stop the poll, click on
 .
.
-
To sharing the polling result with the attendees, click on
 .
.
-
To stop sharing the result click on
 .
.
-
If you want to Edit the Poll, click on
 .
.
-
There are some additional options in poll which you can access if you click on three dots besides the launch button.
-
Click on
 to Relaunch the same poll.
-
Click on
 to Download a copy of the result into your computer.
-
Click on
 to show the results in the browser.
-
Click on
Polling Report
To see the report in Brightspace, please follow these steps:
-
Go to Zoom from the top navigation panel of your Brightspace course.
-
Go to Previous Meetings.

-
Click on Report beside the Meeting.

-
Go to Poll Report.

-
You can see the poll answers here. Also, you can export the responses as a .csv file by clicking Export as CSV file.

To see the report in Zoom web, please follow these steps:
- Go to Zoom.us and sign in with your SMU Email and Zoom password.
- From the navigation panel, go to the Reports page.
-
Under Usage Reports, open Meeting.

-
Under the Meeting report, set the Report Type to Poll Report.

-
Search the report, either using the date range, or using the meeting ID.

-
Click on Generate beside the recording to generate the report for poll.

-
In the next page under report queue, you can see all of you generated reports till now. Download the latest one for your poll by click on Download.

Note: Users using any versions of Zoom older than 5.8.3 will not be able to participate in polls with new question types or take quizzes.
To enable this feature:
- Go to Zoom.us and Sign into your account with SMU Email address and Zoom password.
- From the left navigation panel, go to Settings.
- Go to In Meeting (Basic).
-
Select the check box Allow host to create advanced polls and quizzes.

To create an Advanced Poll, please follow these steps:
- Go to Zoom.us and Sign into your account with SMU Email address and Zoom password.
- From the left navigation panel, go to Meetings.
- If you already have your meeting scheduled, click on the Meeting Topic, and scroll down to the bottom of the page. Otherwise schedule a new meeting and open the meeting by clicking on meeting topic.
-
Click on + Create.

-
Select the option Advanced Pools and Quizzing.

-
It will open the Advanced Polling window (see the screenshot below) where you can add different types of questions accordingly.

To select different types of question, click on the dropdown menu beside the question title.

These are the types of question that you can create with Advanced Polling Feature.
- Single Choice
- Multiple Choice
- Matching
- Rank Order
- Short Answer
- Long Answer (Max 2000 character)
- Fill in the blank
- Rating scale
With the new polling feature, you can also add images to the polling/ quiz questions. To Add images under a question.
-
Click on the three dots below the question.

-
Select the option Upload Image.

You can make a question required in the poll / quiz. To do so, check the option Required under the question.

Also, only for Multiple choice questions you have the option to show the question as a dropdown menu.

You can also create individual polls as a Quiz and set correct answer for the questions:
-
Click on the three dots beside the Save button.

-
Check the option Make a quiz and set correct answers.

-
Now after you added/ edited any question in the poll/ quiz click on Set Answer. Then select the correct answer(s).

Also, you can allow students to answer poll question anonymously:
- Click on the three dots beside the Save button.
-
Check the option Allow participants to answer question anonymously.

Launch Poll in a Zoom meeting
After the meeting is over you can download the response of the Quizzes/Polls from the Meeting Report.
Here is a short introduction on Basic poll which explains how to launch polls and download poll report.
Here is a link to a YouTube video showing how to activate closed captioning and breakout rooms:
Here is a link to a YouTube video showing how to work with breakout rooms:
Enabling Subtitles and Live Transcripts
Zoom licensed accounts have the option to have live Closed Captions enabled during meetings. The Manual Captions and Full Transcript options should be turned on by default. However, if you don’t have it turned on; to enable this option, you will need to access your global settings online at zoom.us prior to hosting your meeting.
- Go to Zoom.us and Sign into your Zoom account.
- From the left navigation panel, Select Settings.
- Go to In Meeting (Advanced).
-
Look for Manual Captions and turn it on.

-
Look for Full Transcript and turn in on.

If you would like participants to be able to save a copy of the transcript to their devices, toggle the Save Captions switch to on.

The host may click the Show Captions button to turn captions on/off for themselves.
The host may also click the arrow pointing upwards (on the show captions button) to disable captions for everyone or to Set up Manual Captions.

Each individual in a meeting can turn on captions for themselves.
Participants will then have the option to turn on the captions for themselves by clicking the Show Captions button  . Captions will appear in an overlay on top of the meeting window, which can be moved around the window by the user. To hide the Closed Caption just from your end, click the Hide Captions button .


Users can also open a panel on the side of their meeting window to view a time-stamped live transcript of the entire meeting (similar look to the meeting chat) with speaker attribution. Please note, the speaker attribution is not always accurate. To do so, participants can click on the small arrow on the Show/Hide Captions button and select View Full Transcript.

Live transcripts do not save in the video file of meeting recordings saved locally. If the Save Captions option is turned on, participants and the meeting host can download a time stamped .txt file of the transcript by clicking on Save Transcript button from the bottom of the transcript pane.
Captions will not be available in the recording if the recording is recorded locally. If you would like to play back the meeting with the captions overlaid, you will need to add the caption file to your media player when you open the video. Alternatively, if you record your meeting to the Zoom Cloud, then you will be able to view the recording with captions online.
Recording to the Zoom Cloud
Note: Currently SMU has a 180-day retention policy enabled for the Zoom Cloud. This means that all recordings saved to the Zoom Cloud will automatically be deleted after 180 days. Please keep this in mind when recording to the Zoom Cloud.
Saving meeting recordings to the Zoom cloud and sharing a password-protected link to the recording with others, ensures meeting recordings retain subtitles and transcripts. However, these recordings are only available in the Zoom Cloud and will auto-delete after 180 days. If you wish to download the recording to your local device, you will still need to download the subtitle file separately.
If you wish for the recording of a Zoom meeting to have a live transcript appear next to the video, follow these steps before recording your meeting to the Zoom Cloud:
- Login to Zoom.us
- Select Settings from the left navigation menu.
- Choose Recordings along the top navigation bar.
- Scroll down to Advanced cloud recording settings
- Select the Audio transcript check box.
- Click Save.
If you wish for the recording of a Zoom meeting to have a downloadable subtitle (VTT) file, follow these steps before recording your meeting to the Zoom Cloud:
- Login to Zoom.us
- Select Settings from the left navigation menu.
- Choose Recordings along the top navigation bar.
- Scroll down to Advanced cloud recording settings.
- Select the Save closed caption as VTT file check box.
- Click Save.
To download the subtitle (VTT) file after the meeting has been recorded and ended:
- Login to Zoom.us
- Choose Recordings along the top navigation bar.
- Choose Cloud Recordings from the top navigation bar.
-
Select your desired recording from the list to open the recording details in a new browser tab.
- Select Download to download all associated files.
- To download a specific file, hover your cursor over the desired file and dlcikc the Download button that appears (download facing arrow).
Language interpretation in Zoom
In a Zoom meeting, you can assign an interpreter for a language. Participants then have the option to hear the meeting in a different language. To enable this feature in the Zoom global setting:
- Login to Zoom.us
- Select Settings from the left navigation menu.
- Go to In Meeting (Advanced).
- Toggle the option Language Interpretation on.
- By default, you have nine languages selected. You can add addition languages click on the plus icon and type the language name.
Now in meeting you can add language interpreter when you are scheduling a meeting.
- Open your Zoom desktop app and schedule a new meeting by clicking on the schedule button.
-
Scroll down to the bottom of the Schedule Meeting window and below the section Interpretation, Check Enable language interpretation.

-
After that add the interpreter’s Email and the language they are interpreting. Click on + Add Interpreter to add interpreter for other additional languages.

- Save the meeting.
Add an ASL Interpreter
Just like other languages, you can also add an ASL interpreter. When Sign Language interpretation view is enabled, hosts can designate up to 20 users as sign language interpreters when scheduling a meeting or webinar, or during the session.
When the meeting or webinar starts, the host must start the interpretation feature, which allows the sign language interpreters to provide their own video channels for the language they are interpreting. Participants can then select the video channel to view the sign language interpretation for an available sign language, and resize or relocate the video window as needed.
ASL Interpreter Prerequisites
- A Zoom account.
- Sign Language interpretation view enabled.
- A meeting or webinar scheduled with sign language interpretation.
- Zoom desktop client.
- Zoom version if you have Windows: 5.11.3
- Zoom version if you have macOS: 5.11.3
- Zoom mobile app.
- Zoom version if you have Android: 5.12.0
- Zoom version if you have iOS: 5.12.0
- Zoom web client.
Note: The minimum version applies to all users in the meeting or webinar, including the host, participants, and sign language interpreters.
Limitations of the Sign Language interpretation view feature
- This feature does not offer sign language interpreters; hosts must provide and assign users as sign language interpreters in the meeting or webinar.
- At this time, sign language interpreters’ videos are not included in recordings.
- This feature cannot be used with Personal Meeting IDs (PMI). To include Sign Language interpretation view, the meeting or webinar ID must be generated automatically.
- Hosts must join the meeting or webinar through the Zoom desktop client to manage and initiate interpretation. They cannot join with any other clients, such as the Zoom mobile app or web client.
- This feature must be selected when scheduling a meeting or webinar, and thus cannot be used for an instant meeting.
Enabling ASL Interpreter View
- Sign into the Zoom web portal on Zoom.us
- In the navigation menu, click Settings.
- Click the Meeting tab.
- Under In Meeting (Advanced), click the Sign language interpretation view toggle to enable or disable it.
- When enabled, 10 default sign languages will appear below the setting. This is the list that will be available when scheduling.
- (Optional) Select the Enable sign language interpretation view by default in scheduler check box to enable it as a default setting when scheduling meetings or webinars, then click Save.
-
(Optional) To add another sign language to the list of available sign languages when scheduling, click the plus icon
 , enter the name of the language, then click Add.

Schedule a meeting or webinar with sign language interpreters
You can schedule meetings with Sign language interpretation view from the Zoom desktop client. If you want to schedule a webinar, use the Zoom web portal method.
- Sign in to the Zoom desktop client.
-
On the Home
 tab, click Schedule
  .
.
- Under Meeting ID, select Generate Automatically. This setting is required for sign language interpretation.
- Under Interpretation, select the check box next to Select sign language interpretation (video channels) below.
-
(Optional) Enter the information for your interpreters. If you don't enter email addresses in this step, you can still assign users as sign language interpreters during the meeting or webinar.
-
Note:
- The sign languages you select for interpreters will create video channels for each of those languages in your meeting, but not all of these channels have to be used in the meeting.
- The pre-assigned interpreters must be signed into the account associated with the chosen email address. If they are not signed in with that email address when joining the meeting or webinar, they will not be recognized as sign interpreters; however, the host can still manually assign them as interpreters in the meeting or webinar.
- You cannot assign the same email address to be both a language interpreter (audio) and a sign language interpreter (video).
- Click Save.
Once scheduled, each interpreter will receive an email invitation for the meeting or webinar indicating which language they will interpret.
Manage the list of interpreters before a meeting
After scheduling a meeting or webinar, you can manage the list of interpreters in the Zoom web portal. You can add more interpreters, resend email invitations, copy invitations, and remove interpreters.
- Sign in to the Zoom web portal on the same account that scheduled the meeting or webinar.
- In the navigation menu, click Meetings or Webinars.
- Click the name of the meeting or webinar you want to edit.
- Scroll down to the Interpreters section, then click Edit.
-
In the Sign Language Interpreters window, do any of the following:
- To add additional interpreters, click + Add Sign Language Interpreter. Then enter the information for your interpreters.
-
To resend an email invitation, click the email icon
 next to the interpreter's name.
-
To copy an email invitation, click the ellipses icon
 next to the interpreter's name, then click Copy Invitation. You can copy the meeting invite to your clipboard to paste and share it with the interpreter.
-
To remove an interpreter, click the ellipses icon next to the interpreter's name, then click Remove This Interpreter. The interpreter is not notified and will still have access to the meeting invitation, but they will not have interpreter capabilities unless the host manually assigns them during the meeting/webinar.
How to manage interpretation during a meeting or webinar
Once you've scheduled a meeting or webinar with sign language interpretation, you can manage interpretation when you start the session.
Note: To start, manage, or end interpretation in a meeting or webinar as the host, you must join the session on the Zoom desktop client. You cannot join through other clients, such as a web browser (web client) or the Zoom mobile app.
- Sign in to the Zoom desktop client.
- Start a meeting or webinar as the host.
-
In the meeting controls toolbar, click the Interpretation
 icon.
icon.
Note: On smaller screen sizes or windows, you may have to click the More
icon, then click Interpretation.
-
A window will open for managing interpretation, where you can do any of the following:
- View everyone assigned to an interpreter role.
- Add or remove someone from an interpreter role.
- Start or end the interpretation feature for everyone.
Add or remove someone from an interpreter role
In the interpretation management window, you can view a list of current language and sign language interpreters. To add or remove interpreters:
- Add an interpreter: Click + Add Interpreter, choose if you want to add a language or sign language interpreter, then select their name and language.
-
Remove an interpreter: Click the delete icon
 next to their name.
Start or end the interpretation feature for everyone
For any audio (language interpretation) or video (sign language interpretation) channels to begin, the host must start interpretation during the meeting or webinar. Interpretation will continue until the host ends it.
At the bottom of the interpretation management window, click Start or End.
- Start: Everyone is notified that sign language interpretation is available. Anyone designated as a sign language interpreter will be shown in a designated video channel for the language they’re interpreting. Participants can choose to view their desired language channel.
- End: Everyone is notified that the host has ended interpretation. For anyone designated as a sign language interpreter, their microphone is enabled but muted by default, and their video reappears in the meeting or webinar.
How to manage your sign language interpreter role
As an interpreter, you can only interpret one language at a time to eliminate language crossover and help reduce confusion.
The host can assign you as a sign language interpreter in two ways:
- When scheduling the meeting or webinar by entering your email address. You will receive an invitation through email, notifying you of the language you’ll interpret along with join details.
- During the meeting or webinar.
Once you join the meeting or webinar and the host starts the interpretation feature with you assigned to a sign language interpreter role, you will be notified that your video is now broadcasting in the language channel you are interpreting. You will see your video indicating that you are on air, and your microphone will be disabled, but the host can give you permission to speak.
Allow a sign language interpreter to talk in the main session of the meeting or webinar
By default, when interpretation is started by the host, sign language interpreters will not be allowed to unmute their microphones, unless given permission from the host.
To give a sign language interpreter permission to speak in the session by unmuting their microphone:
-
In the meeting controls toolbar, click the Participants icon.
- Hover over the name of the interpreter, then click Allow to talk. The sign language interpreter's video will broadcast into the main session, in addition to their assigned video channel. They will see a prompt with the choice to unmute or stay muted.
- (Optional) To mute the interpreter again, right-click their name in the Participants panel, then click Disable Talking.
Their video will no longer be present in the main session and their microphone will be muted.


