Introduction to Microsoft Word
Get Started
Creating a Word document
-
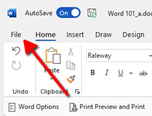
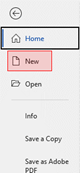
Open Word.
-
On the File tab, click New.
-
In the Search for online templates box, enter the type of document you want to create, and press ENTER.
Formatting and Page Setup
Paragraph Options in Word
-
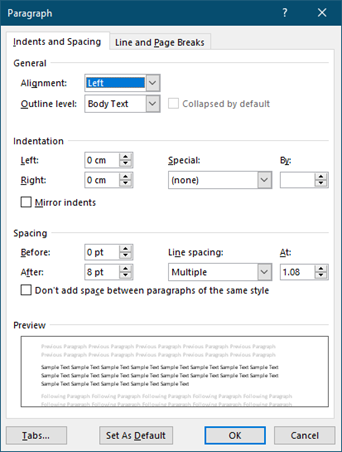
On the Home tab, find the Paragraph group (third from left), and click on the small arrow in the lower right corner.

-
Here, you can select various useful formatting options, such as special indentations or spacing.
Format text
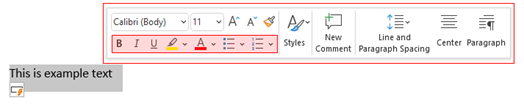
- Place the cursor and type some text.
-
To format, select the text and then select an option: Bold, Italic, Bullets, Numbering, and more.
How to use a border as a line header in Word
- Open Microsoft Word, and the appropriate document.
- Highlight the heading you want to add a line under.
-
From the Home tab, find the Paragraph group and select the Borders drop-down menu.
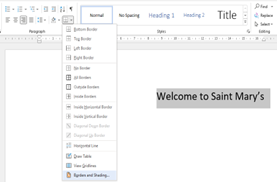
- From the drop-down select Borders and Shading…
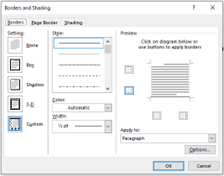
- The Border and Shading dialog box will pop-up.
- Pick the line style from the Style section.
- From the Apply to drop-down, select Paragraph and choose where you wan the line to appear.
-
Click OK and the line will appear under your heading

Show/Hide Formatting in Word
-
On the Home tab, find the Paragraph group (third from left), and select the ¶ This will visually indicate formatting in your document and is a great
tool for troubleshooting.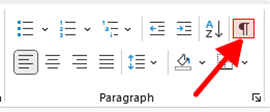
Design, Edit, and Pictures in Word
Using Breaks in Word
-
On the Layout tab, find the Page Setup group (first from left), and select the Breaks drop-down menu. Then, choose a break style.
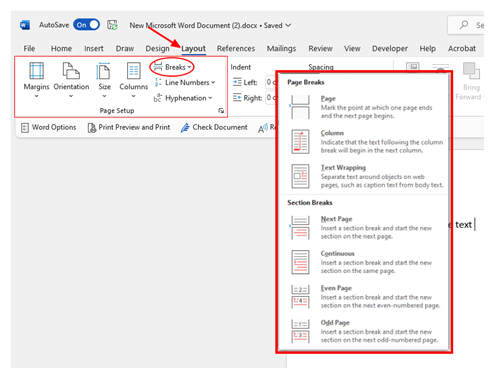
- Page Breaks are used for local formatting (e.g. one page ending), while Section Breaks are used for defining large sections of page numbers, header styles, or references within a document. Be sure to use the correct style.
Headers & Footers in Word
-
On the Insert tab, find the Header & Footer group (fourth from right), and select the Header or Footer drop-down menu. Then, choose a style.
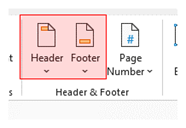
- You can find more formatting options using the Header & Footer Tools tab (when the header or footer is selected).
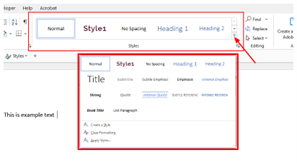
Heading Styles in Word
-
On the Home tab, find the Styles group (fourth from left), and select a Heading # The lower the #, the greater the ‘importance’ of the style. For example, this is useful when making sub-sections in a Table of Contents.
-
Add section or sub-section title text to the document, and then select the
Normal style to continue adding body content.
Page Numbers in Word
- On the Insert tab, find the Header & Footer group (fourth from right), and select the Page Number drop-down menu. Then, choose a location and style.
-
You can further format page numbers using the Header & Footer Tools tab (when the footer is selected), or by using the Format Page Numbers options, under the Page Number drop-down menu.

Use Styles
Styles templates apply a consistent font, font size, font color, and spacing to headings, paragraphs, and titling throughout your document.
- Select the words, paragraph, list, or table to edit.
- On the Home tab, select a style.
- If you do not see the style you want, click the More button to expand the gallery.
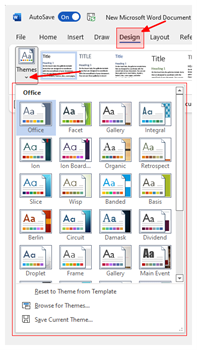
Apply Themes
Themes add a professional look to your document.
- Select Design > Themes.
- Point to a theme to preview how it will look.
-
Select the theme you want.
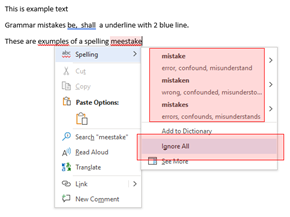
Check spelling and grammar
Word marks misspelled words with a red squiggly underline and grammar mistakes with a blue double underline.
- Right-click the word.
-
Select a correction or select Ignore.
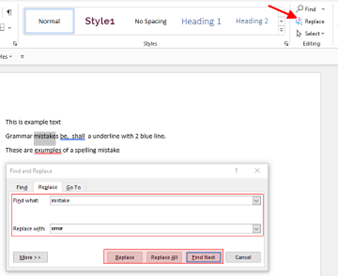
Find and replace text
- Select Home > Replace.
- For Find what, enter a word or phrase to search. For Replace with, enter the new text.
-
Select Find next, and then select:
- Replace to replace the first instance, or
-
Replace all to replace all instances.
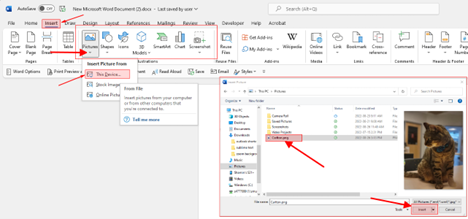
Pictures in Word
- On the Insert tab, find the Illustrations group (third from left), and select the Pictures button.
-
Navigate to the desired picture and select Insert.
-
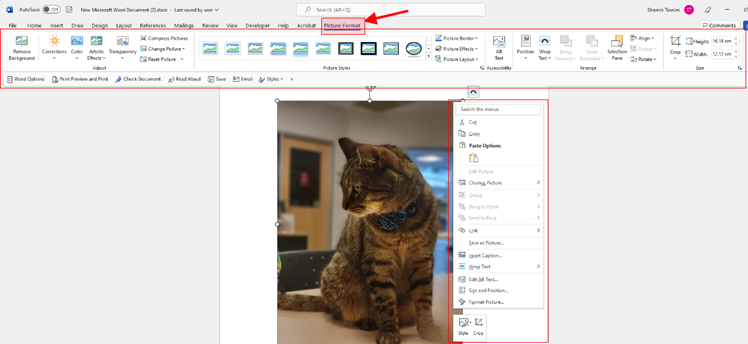
Once added to the document, a picture can be manipulated with the mouse (right clicking; dragging elements), and via the Picture Tools tab that opens when the picture is selected. Of note are the Position and Wrap Text drop- down menus.
Screenshots in Word
- Navigate to a desired screen and press the Print Screen You can also obtain more refined screenshots using the Snipping Tool or press Windows key + SHIFT + S. Mac users can use the shortcut CMD + SHIFT + 4 or CMD + SHIFT + 3 for full screen. Copy this image to your clipboard.
- In Word, use the Paste function, or press CTRL-V key (CMD + V on Mac), to insert the screenshot.
- Screenshots are treated the same as images
How to fill an image to a shape in Word
- Open Microsoft Word, and the appropriate document.
-
Right-click the shape you want to fill with an image. Select Fill from the shortcut menu.
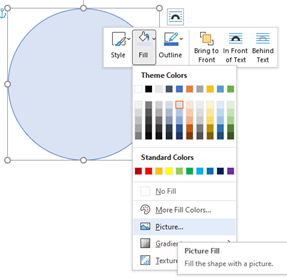
- Navigate your computer to get the appropriate picture. Click okay to insert your selected image.
- Once your image has been inserted, select it again.
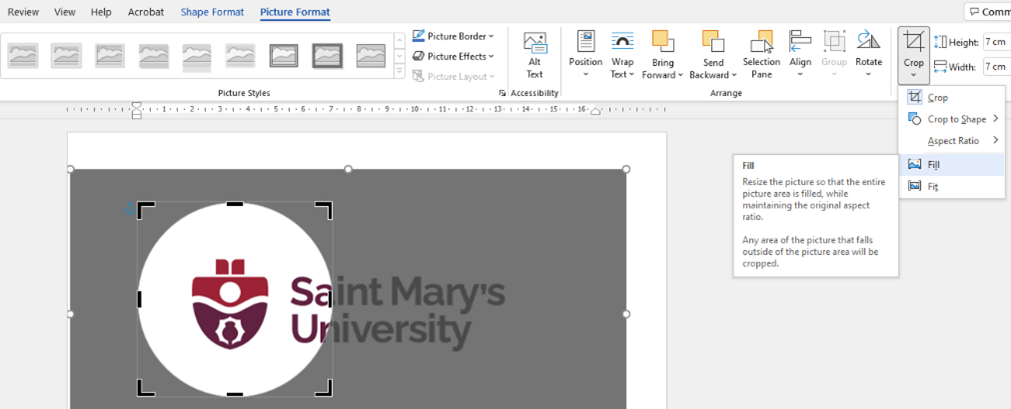
- Go to the Picture Format Find the Size group (fifth from the left). Click on the down arrow below Crop and select Fill from the drop-down menu.
-
This will auto adjust your image to crop to the image. You can click and drag your image to place it appropriately

Save, Share, and Print Documents
Save a document
-
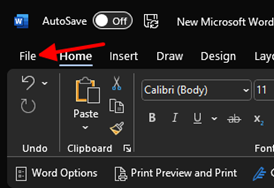
Go to File > Save As(or Save a Copy).
- Select OneDrive so you can get to your document from anywhere.
-
Enter a name and click Save.
Convert or save a document to PDF
-
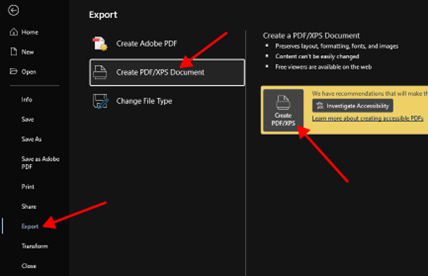
Go to Export > Create PDF/XPS Document > Create PDF/XPS.
- Select where you want to save your document, like OneDrive.
- Check .. to change properties.
- Select Publish.
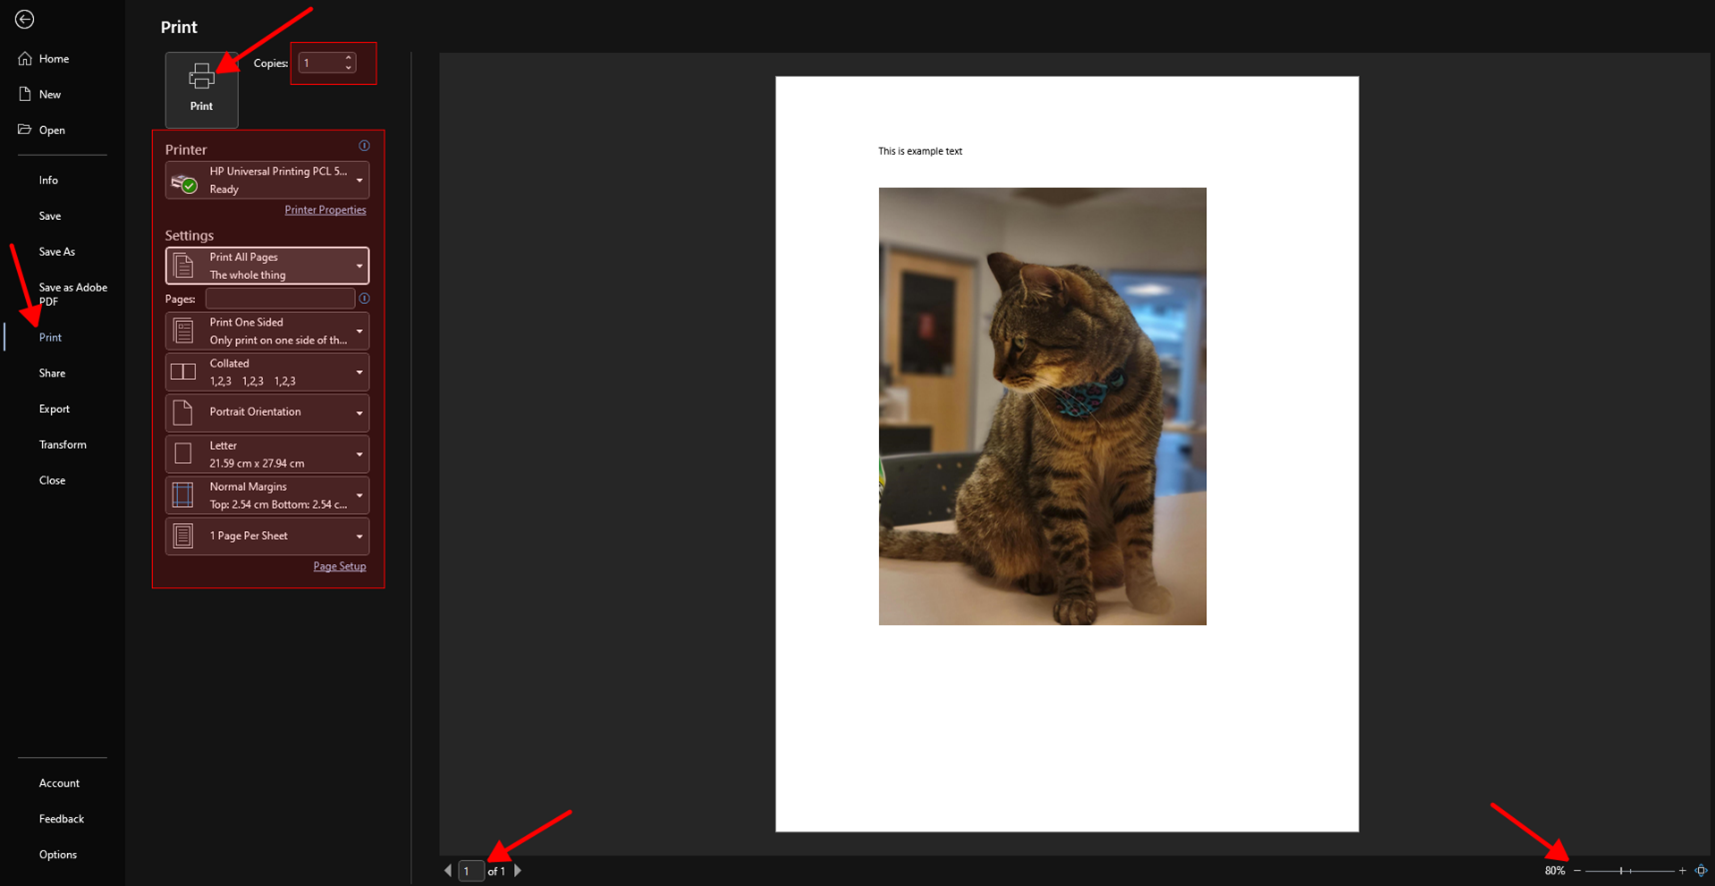
Print your document
- Select File > Print. On the right, you’ll see a preview of your document. On the left, you'll see the Print button and the configurable Settings.
- To see each page, click the arrow at the bottom of the preview, and if the text is too small, use the zoom slider to adjust it.
- Choose the number of copies you want, and choose the printer to use.
- Explore Settings to print on both sides of the paper, change the paper orientation, and other configurations. These functions will differ according to the capabilities of your printer.
-
When you're ready, select Print.
Save your document to OneDrive
- Select File > Save As.
- Select OneDrive.
- Save personal files to OneDrive - Personal, and work files to your company OneDrive. You can also save to another location in the list, or Add a Place.
- Enter a descriptive name for the file, and select Save.
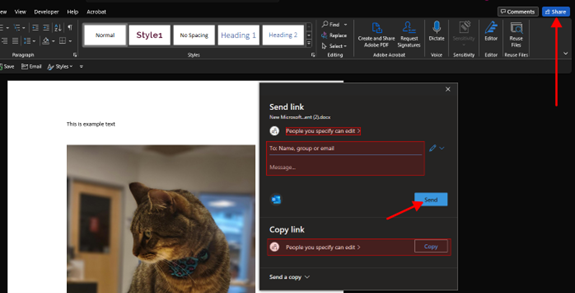
Share your document
-
Select Share
on the ribbon.
- Or, select File > Share.
- Select who you want to share with from the drop-down or enter a name or email address.
-
Add a message (optional) and select Send.
Co-edit a document
fter you share your document, you can work on that file at the same time with others.
- For the best experience, work together in Word for the web and see real-time changes.
- Under Share, you will see the names of who else is also editing the file.
- Colored flags show you exactly where each person is working in the document.
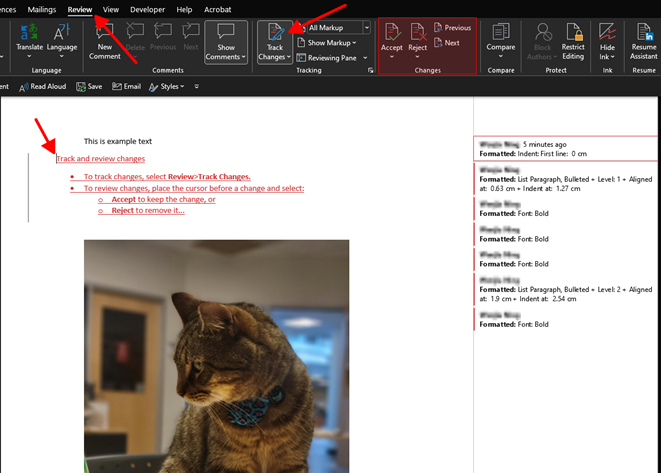
Track and review changes
Track and review changes
- To track changes, select Review > Track Changes.
-
To review changes, place the cursor before a change and select:
- Accept to keep the change, or
-
Reject to remove it.
Anonymous Comments in Word
- Open the document, with comments, that you want to make anonymous.
- Click on File (top-left).
- Click on Info (top-left).
- Click on the Check for Issues drop-down menu (centre-left), and then Inspect Document.
- Choose whether or not you’d like to save the document before making the personal information changes; recommended for important documents.
- Ensure that Document Properties and Personal Information is checked, then click on Inspect (bottom-right).
- When given the results, next to Document Properties and Personal Information, click on Remove All. Then, click on Close (bottom).
- Save the document with a new name.
- Check to see that your changes are anonymous. They should say “Author”,
- rather than your name. You may need to click elsewhere in the text for this to take effect.
- All done! This tool can be used to remove other unwanted hidden formatting, but be careful to save a different version both before and after making changes.
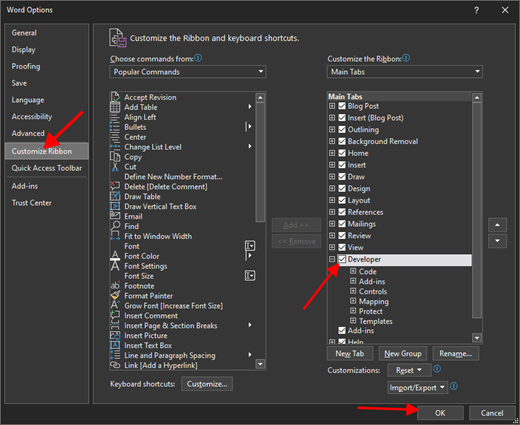
Creating a form
-
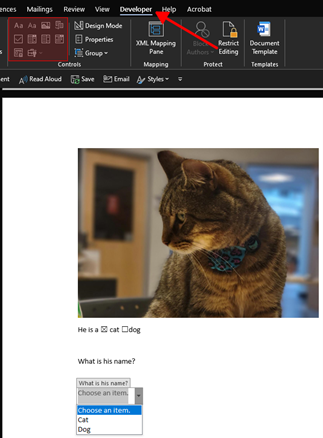
Click the File tab, Click on Options (bottom left), then click on Customize Ribbon (left). Click on Main tabs and verify that the tick box next to Developer is checked. Click OK when you are finished.
-
Type out the questions for your form, including any descriptive text that you
want the reader to see. -
Click on the Developer tab on the ribbon. Position your mouse cursor at the first point in the form where you want a fillable section to be displayed. Then choose the relevant option from the Control section of the ribbon. Your options include plain text boxes, check boxes, drop-down menus, and more. Repeat this process until you have added all the fillable areas you wish to include in the form.
-
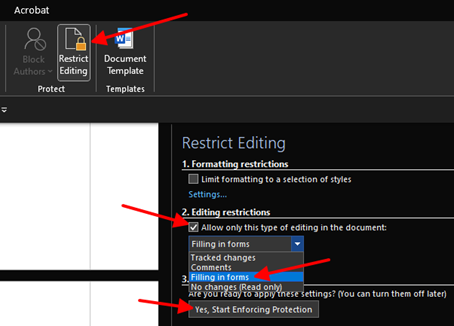
Click Restrict Editing from the Protect section of the ribbon. Under the Editing Restrictions header drop-down menu, select Filling in forms. Click Yes, Start Enforcing Protection under the Start Enforcement header.
-
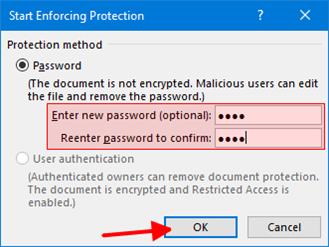
Type a password into the Enter new password text box. This is an optional step, but if you don’t do this, anyone will be able to undo the protection you just set up on the document.
- Save the file.
- All done! You have now created a form that users can fill in using Microsoft Word, without fear of them editing the document.
Creating a Table of Contents
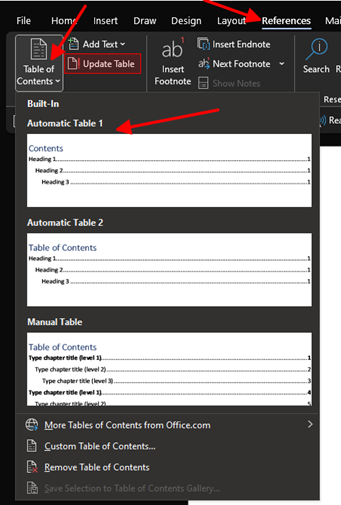
- On the References tab, find the Table of Contents group (first from left), and select the Table of Contents drop-down menu. Then, choose a style (automatic or manual).
-
An automatic Table of Contents will populate with your headings and page numbers, and can be updated using the Update Table button.
References in Word
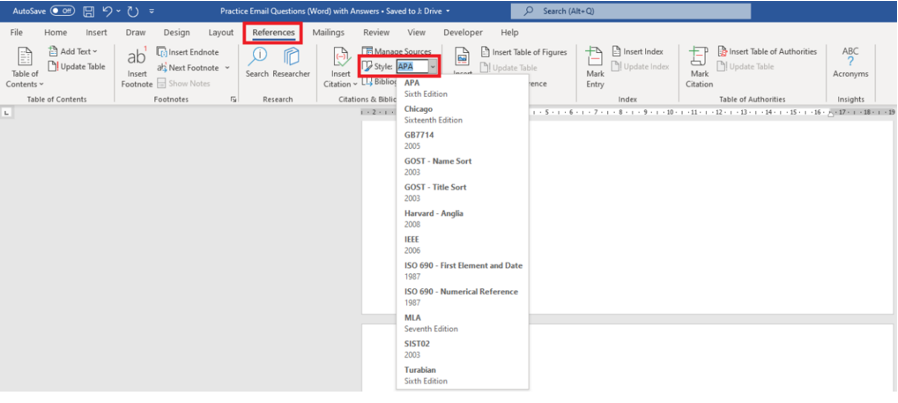
You can add referencing of various formats in Microsoft Word through the References tab:
-
To add new references, open the specific Word document and head over to the References tab. In the Citations & Bibliography group, click the arrow (drop-down menu) next to Style and choose the Citation & Source style.

- Next, move the cursor/click at the end of a sentence or phrase that you want to cite.
-
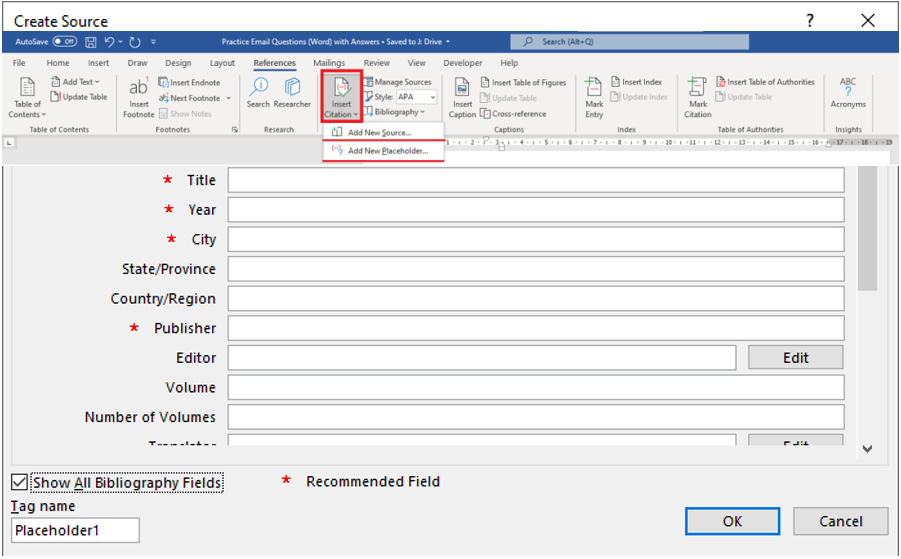
Then, from the References tab, click Insert Citation to add a Source or add a Placeholder.
-
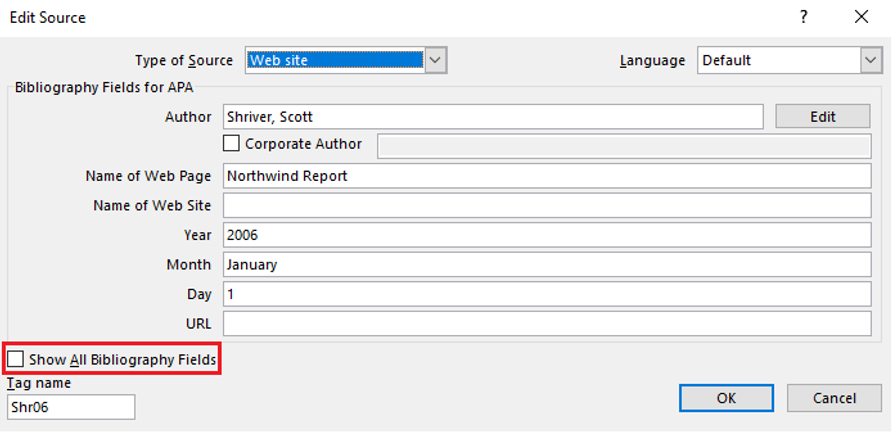
For adding a Source, click on Add New Source. Enter all the details for the Source that you are creating and choose the Type of Source. You can check the Show All Bibliography Fields checkbox to put in all the information for the Source that you are creating. To add multiple authors, separate them with a semicolon.
-
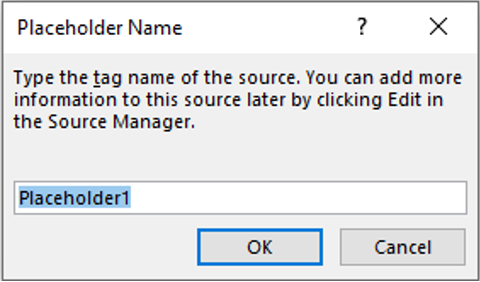
For adding a Placeholder, you can create the Source information for Citation later. Click on Add New Placeholder and give it a name. The Placeholder will show up in the Source Manager.
-
For adding a Source, click on Add New Source. Enter all the details for the Source that you are creating and choose the Type of Source. You can check the Show All Bibliography Fields checkbox to put in all the information for the Source that you are creating. To add multiple authors, separate them with a semicolon.
- Click OK when you are done. The Source will then be added as a Citation at the place you selected in your document.
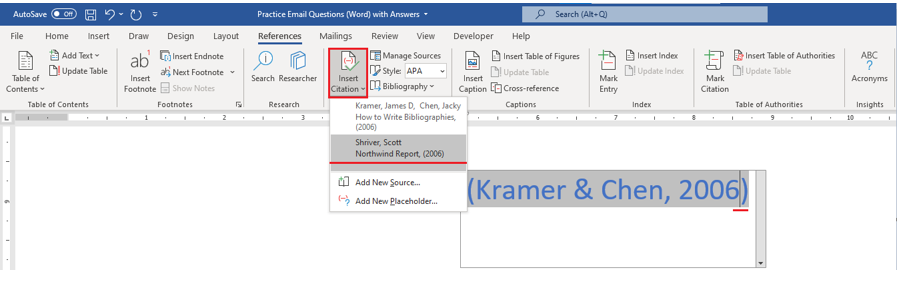
The above-mentioned steps are for adding a completely new Source & Citation. If the Citation you want is already created before-hand or you want to use the same Citation that you just created again then:
-
Click at the end of the sentence or phrase that you want to cite, and then head over to References tab, in the Citations & Bibliography group, click Insert Citations. Select the Citation you want to use from the list.

-
If you want to insert multiple Citations in the same place, then, place your cursor to the left of the closing parenthesis of the Citation that is already inserted and reselect Insert Citation and select the second Source.
-
The punctuation inserted between the Sources will depend on the Style guide chosen for your citations in the Style menu under the References tab. For example, the Chicago and Turabian styles use commas between Sources, and the APA and MLA styles use semicolons between Sources.
-
The punctuation inserted between the Sources will depend on the Style guide chosen for your citations in the Style menu under the References tab. For example, the Chicago and Turabian styles use commas between Sources, and the APA and MLA styles use semicolons between Sources.
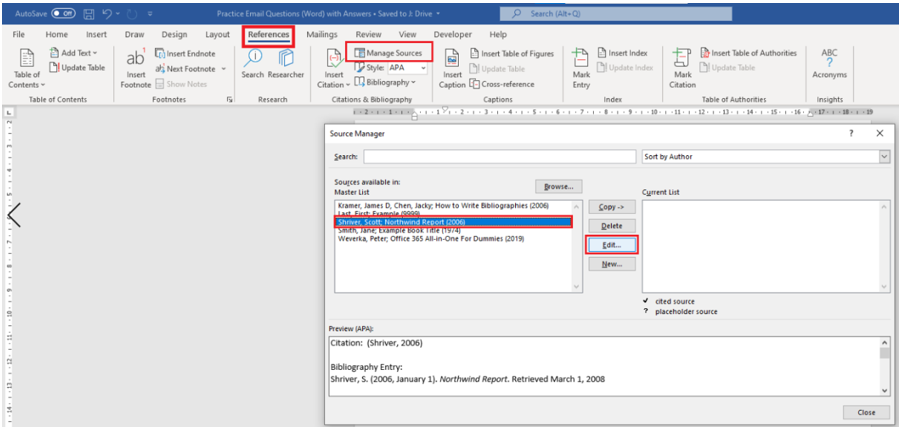
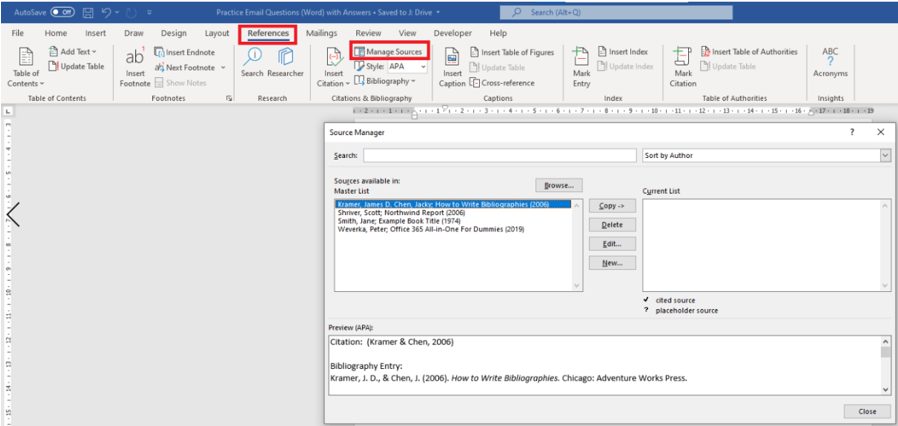
You can also find and edit an already created Source from the Manage Sources:
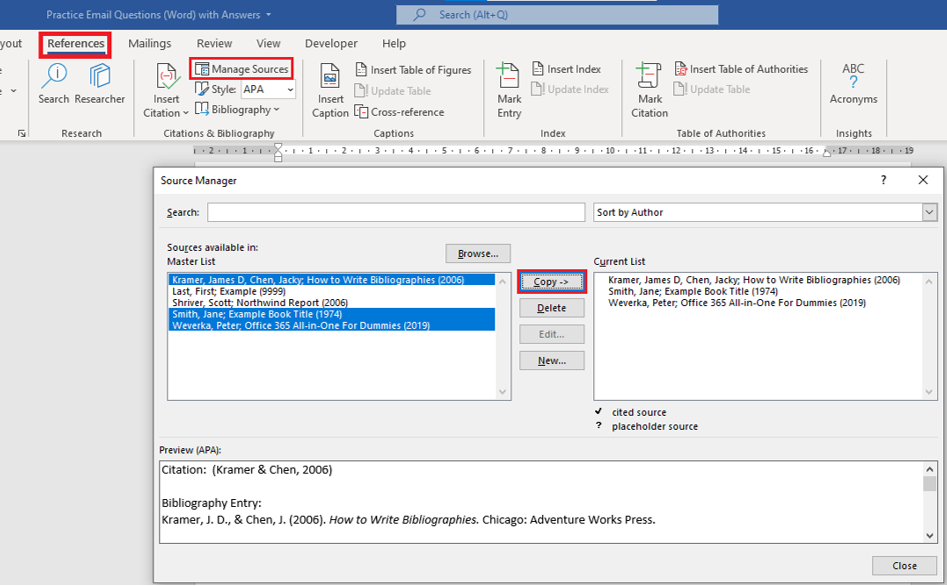
- From the References tab, in the Citations & Bibliography, click on Manage Sources.
-
Choose a Source from the Master List. You can sort the Master List by author, title, citation tag name, and year. You can also search up a Source by its title or author.
- The Master List is stored in your computer and is accessible in all your documents. The Current List is part of your current file and is only accessible in that file. By default, Word stores new Sources in both the Master List and the Current List.
-
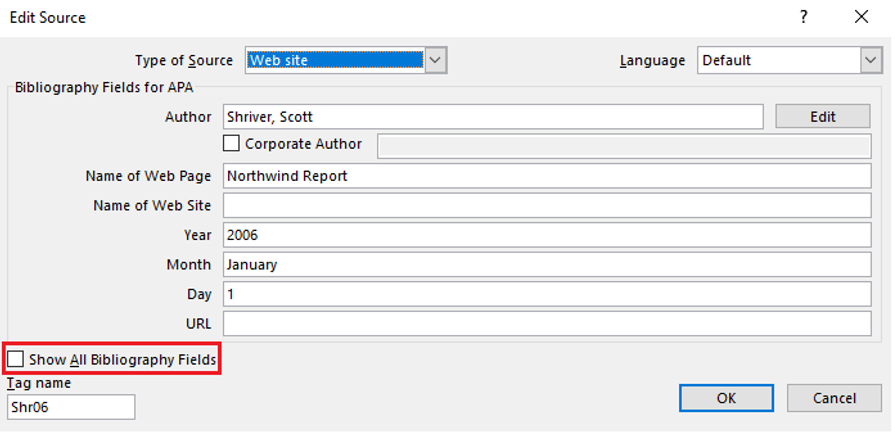
To edit a Source, select a specific Source from the Master List/Current List and click Edit. An Edit Source dialogue box will pop up. You can check the Show All Bibliography Fields checkbox to show additional information to add changes and click on OK when done.
-
To remove a Citation from your document, you can select the specific Citation and then select the Citation Option menu. From there, you can choose to Remove, Edit Citation, Edit Source.
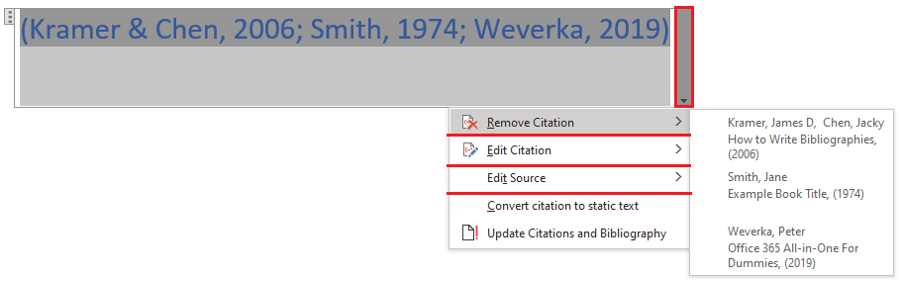
- If you choose to Remove Citation, it will remove the specific Citation that you choose.
-
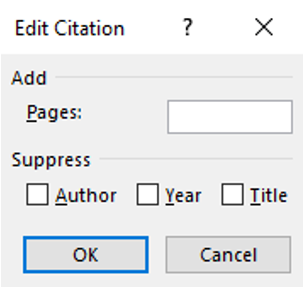
If you choose to Edit Citation, it will open the Edit Citation menu after you choose the specific Citation. You can then add page numbers or suppress (remove) the author’s name, year, or title.
-
If you choose to Edit Source, it will open the Edit Source menu. From there, you can add/remove any information (you can see more information if you check the Show All Bibliography Fields) specific to the Source you selected.
If you want to insert a list of Sources that you already have created, you can do that with the Bibliography option:
-
From the References tab, click on the Bibliography drop-down and choose Insert Bibliography.
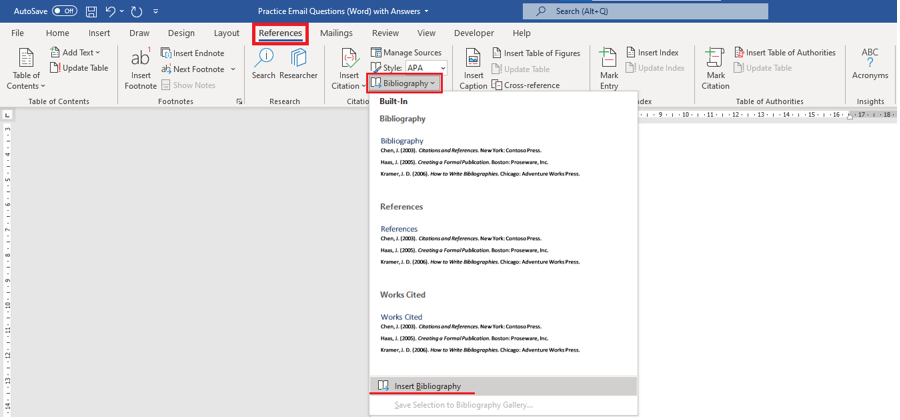
- If there are no Citation Sources in the Current List from the Manage Sources menu, then you will be adding an empty bibliography in your document.
- Make sure you add all the Citation Sources, or if you want to choose specific Citation Sources, head over to Manage Sources and choose the Sources you want (you can hold the control button to multi-select) and choose Copy. This will copy the Sources chosen from the Master List to the Current List. Now if you select Insert Bibliography, it will insert a list of the chosen Citation Sources.
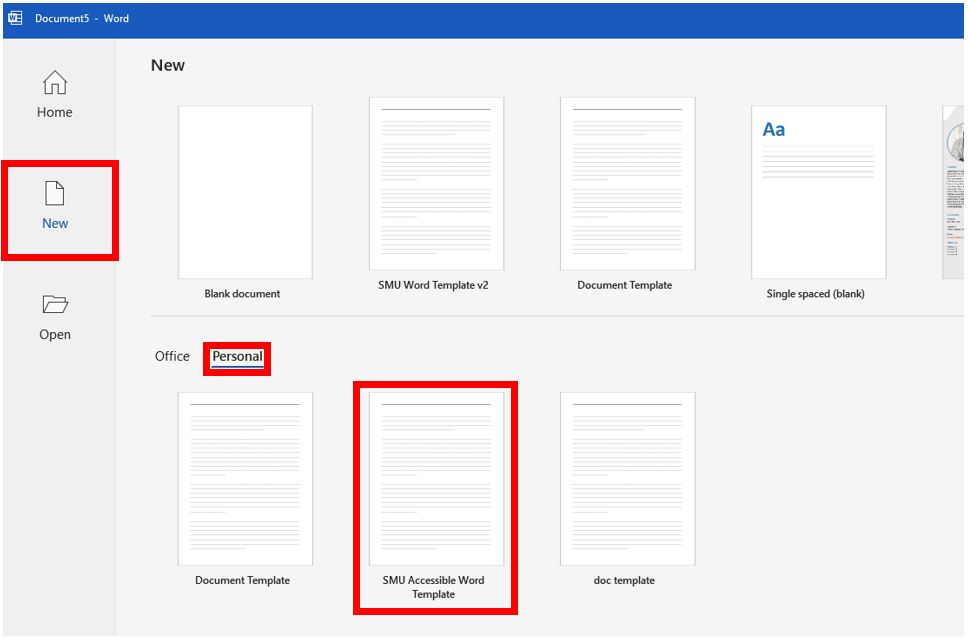
Accessible Word Template
- Download the Accessible Word template from the link below and save it under Documents > Custom Office Templates.
- Open Word.
- Select New, then select the personal tab.
-
Select the SMU Accessible Word Template.
- Make sure to save your file and give it a meaningful name.
- Continue working on the document as normal.
- You can repeat steps 3-5 everytime you want to use the SMU Accessible Work Template for a new document.


